<?xml version="1.0" encoding="utf-8"?><feed xmlns="http://www.w3.org/2005/Atom" ><generator uri="https://jekyllrb.com/" version="3.10.0">Jekyll</generator><link href="http://localhost:4000/feed.xml" rel="self" type="application/atom+xml" /><link href="http://localhost:4000/" rel="alternate" type="text/html" /><updated>2026-03-26T22:23:22+01:00</updated><id>http://localhost:4000/feed.xml</id><title type="html">Reevik</title><subtitle>Erhan Bagdemirs Personal Blog.</subtitle><entry><title type="html">Code Inventory</title><link href="http://localhost:4000/Code-Inventory/" rel="alternate" type="text/html" title="Code Inventory" /><published>2025-01-24T09:41:50+01:00</published><updated>2025-01-24T09:41:50+01:00</updated><id>http://localhost:4000/Code-Inventory</id><content type="html" xml:base="http://localhost:4000/Code-Inventory/"><![CDATA[<p>I occasionally meet younger developers and having our conversations about software development. I often hear the same question: “You have been in this industry for such a long time. Do you have any advice on how we can improve as software developers ?”. My answer is always the same: “Yes, be curious, try new things out and build a code inventory”. I think, if you are on social media, you will enough motivation videos on “stay hungry, curious and foolish” but in this article, I will rather focus on the inventory part.</p>

<p><img src="/images/26.png" /></p>

<p>I recall the days when I started writing my first line of code on my Pentium 75 PC. It was the late 90s and the economic forecast in my home country was bleak. High inflation rates relentlessly squeezed the mid-class to the brink. Six days workweek was almost the norm in Turkey. My dad worked tirelessly, but a PC was actually a luxury item. Savings were dwindled long before we could afford to buy a PC.</p>

<p>So it took a decade before we could afford a PC. In the meantime, I grew up and started high school in my hometown. I already had a few programming hours under my belt at the high school, which was unusual for a state school at that time to offer students a computer lab and teach programming. Basic was the very first programming language that I learned. The progress of learning sped up as I got my first personal computer. Pascal, Delphi, C, C++, and many more. I was trying to write a software to chat with other people over a barely connected computer via a 56K modem. Or to understand how to develop my own VCL components in Delphi. Even I tried to write my own operating system with C but quickly lost my focus once I discovered the speed of feedback loop with web development.</p>

<p>I wrote countless lines of code across many programming languages. One habit became second nature: backing up my code. Initially, I relied on copies on a separate hard-disk partition, but later, after I purchased a second-hand 4x CD-writer, started burning them onto CDs. I still have the copies from the 90s today and review my code thirty years later. I eventually created a personal code inventory, which I can pull out when I need to revive my coding skills in a specific programming language. Today, the compact disks maybe do not exist anymore, but there are better options than burning data onto a hard medium. The service providers like Gitlab, Github, Bitbucket, etc. offer free version-controlling options, which you can use to create your inventory within seconds.</p>

<p><img src="/images/inventory.png" /></p>

<p>But, what is the value of creating a personal code inventory and maintaining it? A code inventory is like a collection of old photographs—it lets you compare your current coding skills to your past ones. I occasionally dig up old projects and review them just for fun. Sometimes, the old code disappoints me, and it can even be a little embarrassing when I realize I published my spaghetti code online without any tests. But that’s okay. More often than not, though, I’m amazed by the solutions I came up with in my mid-20s or the elegant designs I crafted from scratch.</p>

<p>An inventory can also help you kickstart new projects by repurposing reusable components from past ideas. That’s why it’s important to aim for higher standards, even when working on hobby projects or prototyping ideas. Keep in mind—the code you write today might still be valuable years down the line.</p>

<p>Maintaining a public project inventory also gives you the opportunity to collaborate with other developers. By publishing your projects on public Git repositories, you can contribute to the open-source community. When sharing your code, it’s important to maintain high-quality standards because the code you publish is visible to everyone and becomes a reflection of your expertise. This process encourages you to think and act like an engineer, helping you shape and strengthen your engineering mindset.</p>

<p>I have many personal projects in my code inventory that I still re-use in my daily work. I’m passionate about challenging my skills and implementing ideas I find interesting, even if someone else has already created a widely-used, popular project. There’s immense satisfaction in saying, ‘Look, Spring is an outstanding framework, but I’ve created my own minimalistic dependency injection library.’ It’s rewarding to have walked the same rough path that those industry-leading projects once did. This experience helps me better understand the challenges, think more creatively, and develop new ideas based on existing ones.</p>]]></content><author><name>erhan</name></author><category term="Engineering Culture" /><category term="featured" /><summary type="html"><![CDATA[What is the value of creating a personal code inventory and maintaining it?]]></summary><media:thumbnail xmlns:media="http://search.yahoo.com/mrss/" url="http://localhost:4000/images/26.png" /><media:content medium="image" url="http://localhost:4000/images/26.png" xmlns:media="http://search.yahoo.com/mrss/" /></entry><entry><title type="html">Consistent Hashing Explained</title><link href="http://localhost:4000/Consistent-Hashing/" rel="alternate" type="text/html" title="Consistent Hashing Explained" /><published>2023-05-17T10:41:50+02:00</published><updated>2023-05-17T10:41:50+02:00</updated><id>http://localhost:4000/Consistent-Hashing</id><content type="html" xml:base="http://localhost:4000/Consistent-Hashing/"><![CDATA[<p>Consistent Hash Ring is a widely used technique in the process of distributing and load balancing data or operational workload across multiple system components with high fault tolerance. This technique aims to allow distributed shared data to be accessed again without the need for another indexing or discovery component and enables the remaining components, referred to as nodes, to manage their data by minimizing data relocation when any hardware in the system becomes unavailable for any reason. This method forms the load balancing mechanism of applications such as Dynamo DB, HAProxy.</p>

<h3 id="consistent-hashing-explained">Consistent Hashing Explained</h3>

<p>As the size of the data to be stored or the operational workload on the system increases, it becomes impossible to handle this amount with a single physical hardware, and the need for managing the load across multiple hardware components, i.e., horizontal scaling, arises. In addition, distributed data or workload shared across multiple components in a distributed system should be accessible by clients with minimal effort. For instance, in a NoSql database, accessing randomly distributed data on multiple nodes would require querying each system component one by one, resulting in a linear time-complexity in the number of added hardware to the discovery operation. This is not a desired approach. One solution to optimize the linear characteristic of the discovery operation is to introduce an external indexing component which tracks the nodes on which the data reside but it is not the only solution. Functions that yield the same result for a specific input can eliminate the need for external component usage for indexing and discovery. For example, hash functions can be used for this purpose.</p>

<p>
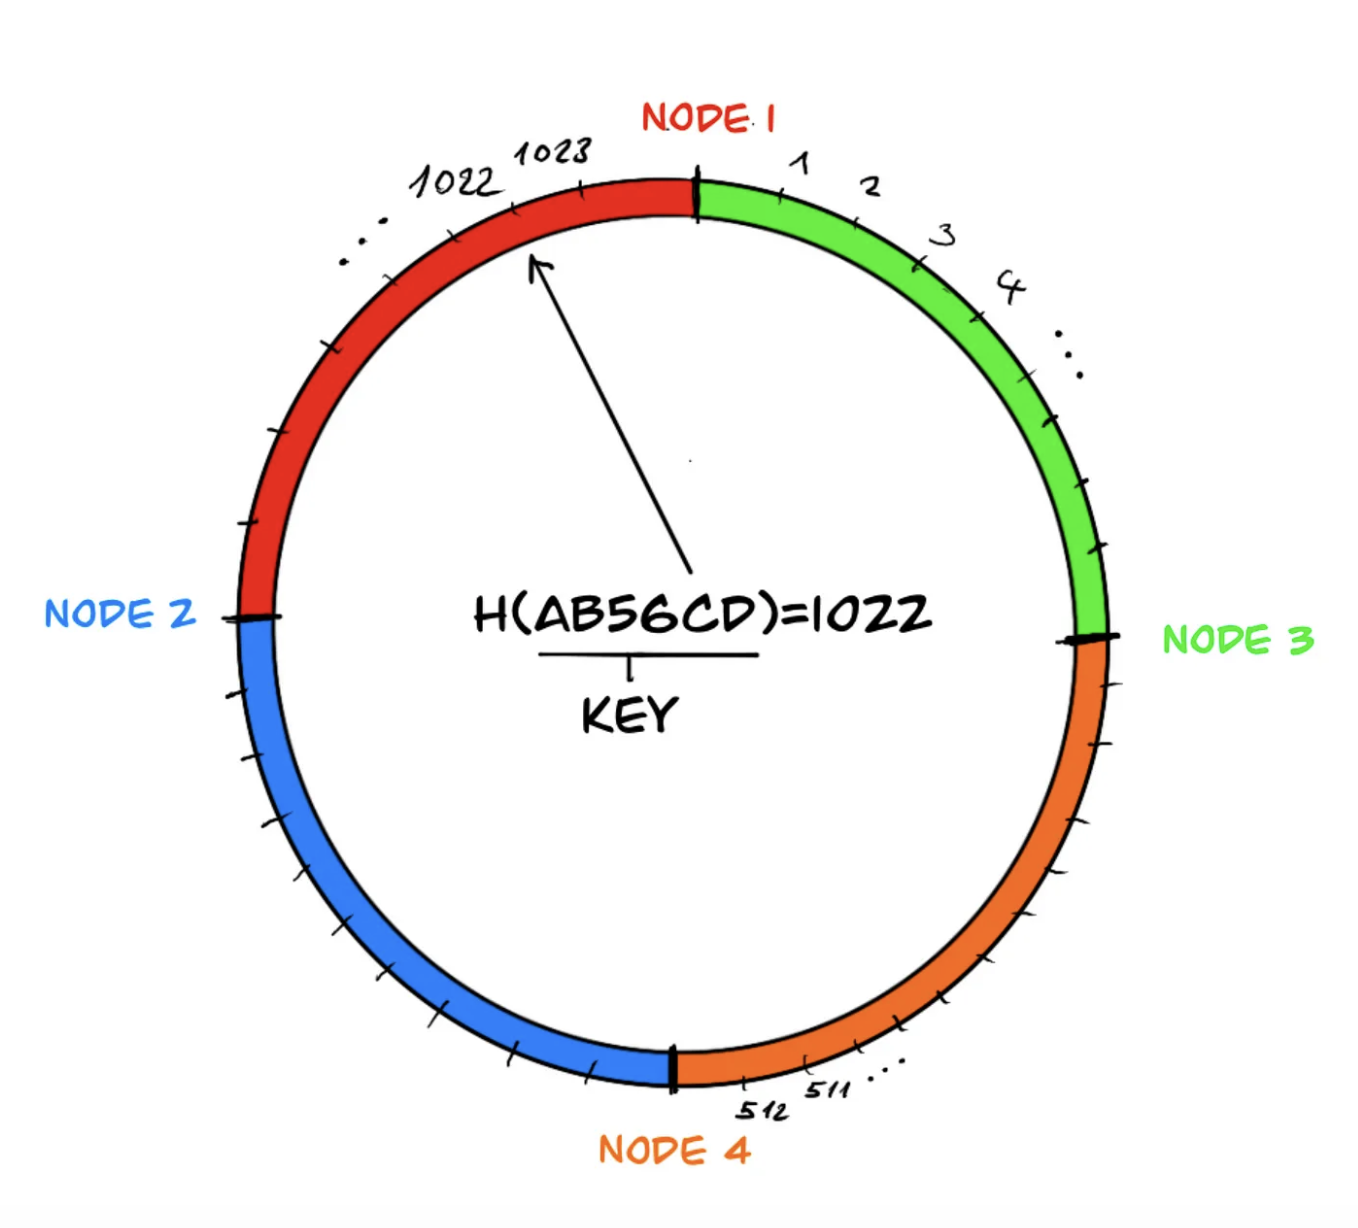
Hash functions have the property of consistently mapping a random number of elements in the input space to a finite output space, where these elements of the set are called buckets. In other words, for each input x, hash(x) = y, the number of elements in the function’s result set is determined. Using this property, for example, we can map the keys of data sets in a cache or database to the elements of the hash function’s result set. Then, in the next step, we can reduce the resulting value to the desired number of nodes without breaking the mapping consistency by applying the modulus operation. As an example, let A = {1a24d21, c12d422, …, 1e14e124a21} be a key set for which a hash function’s value set is defined such that h(x) = y, for x ∈ A, y = {1, 2, …, 1024}, meaning that for each element in set A, the hash function returns a value up to 1024. If the data to be stored is distributed across four nodes, by applying the modulus operation to the result set, z = y mod 4, we obtain the desired node index, and h(“AB56CD”) = 5, 5 mod 4 = 1, indicating node number 1.</p>

<p>The above example is actually one approach to implement consistent hashing by using hash and modulus functions. If we visualize this implementation, we can imagine that the elements of the hash result set are arranged on a circle and the circle is divided by the nodes which own the before-coming elements:</p>

<p><img src="/images/chr_g1.png" /></p>

<p>Each differently colored section in the ring defines the key range managed by the nodes, and if we continue moving on the circle beyond the last node area, just like in the modulus operation, we return to the beginning, the first node.</p>

<p>
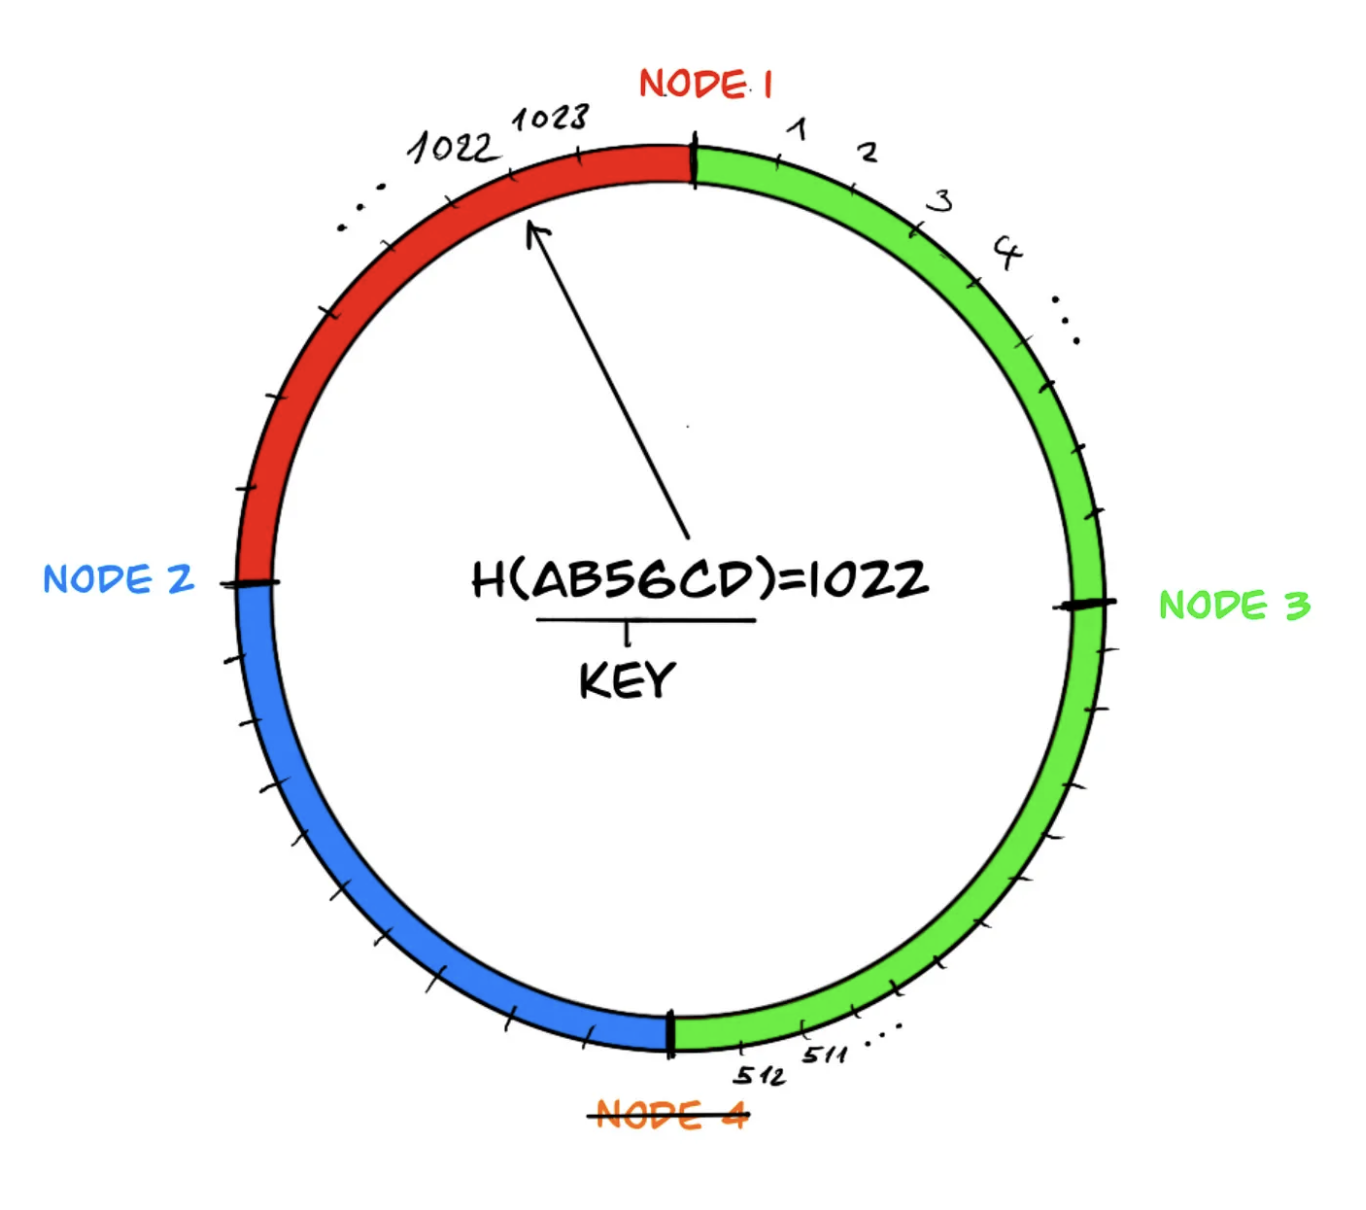
Notice that for a key in the key space, the hash function gives the same output regardless of the number of nodes. If there is a decrease in the number of nodes, the area of the neighboring node responsible for the area of the departed node (in the example, node 4) is merged, eliminating the need for any changes in the data sets managed by the other system components. This way, the impact caused by the departed node does not spread throughout the system and remains local.</p>

<p><img src="/images/chr_g2.png" /></p>

<h3 id="virtual-components">Virtual Components</h3>

<p>
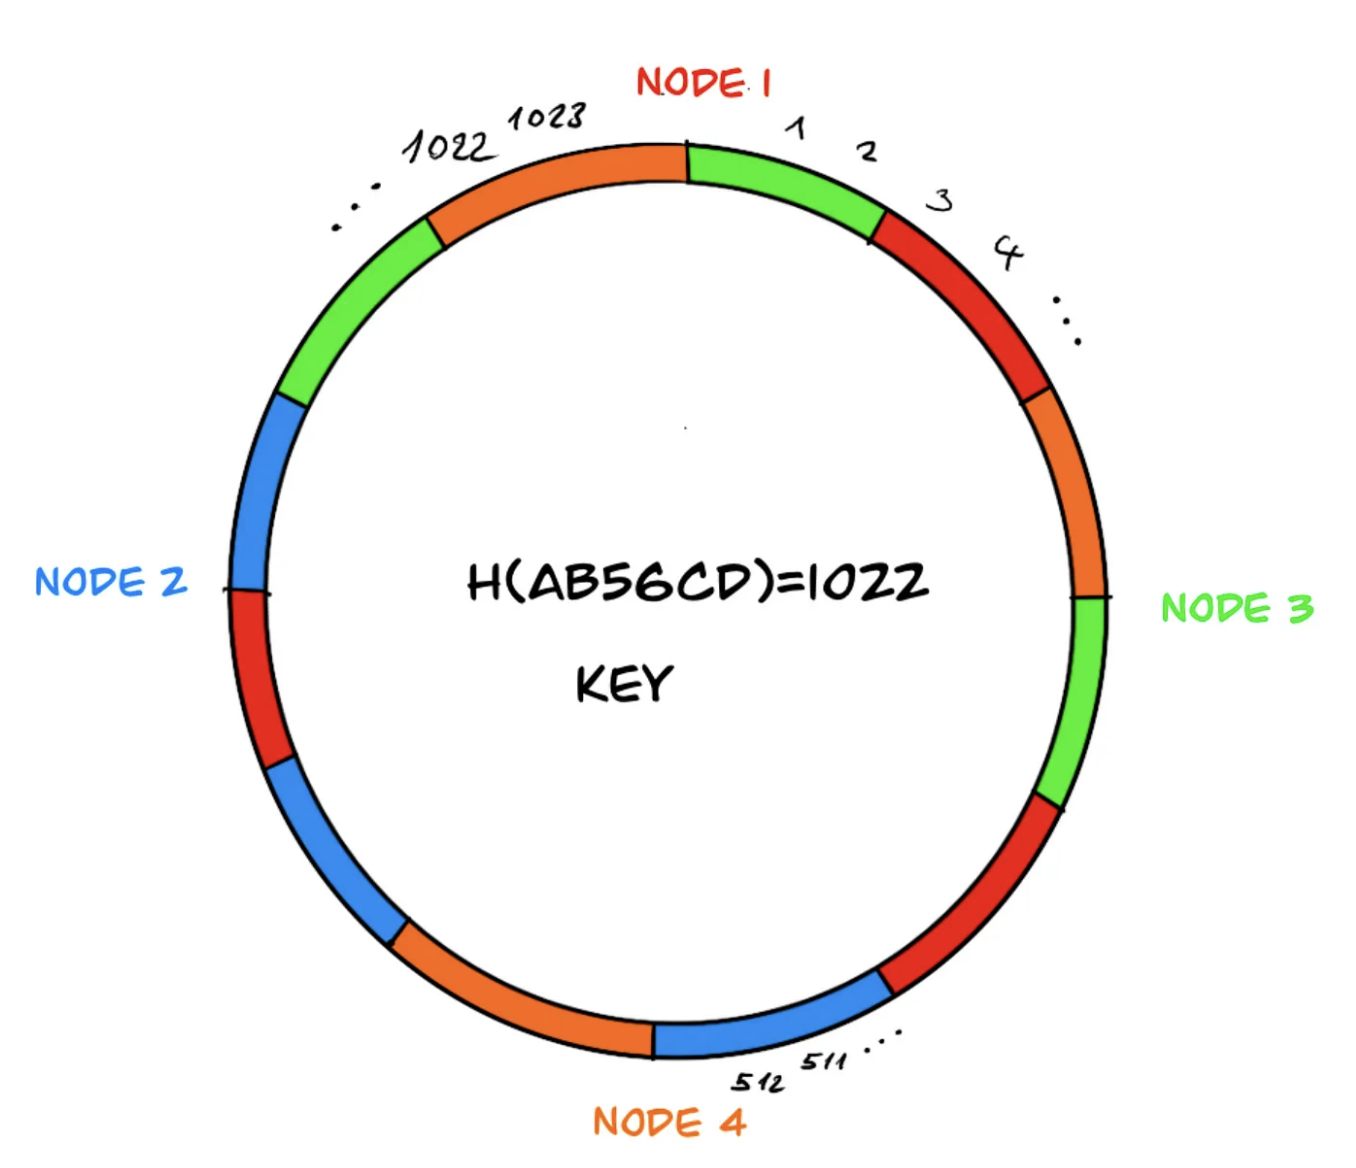
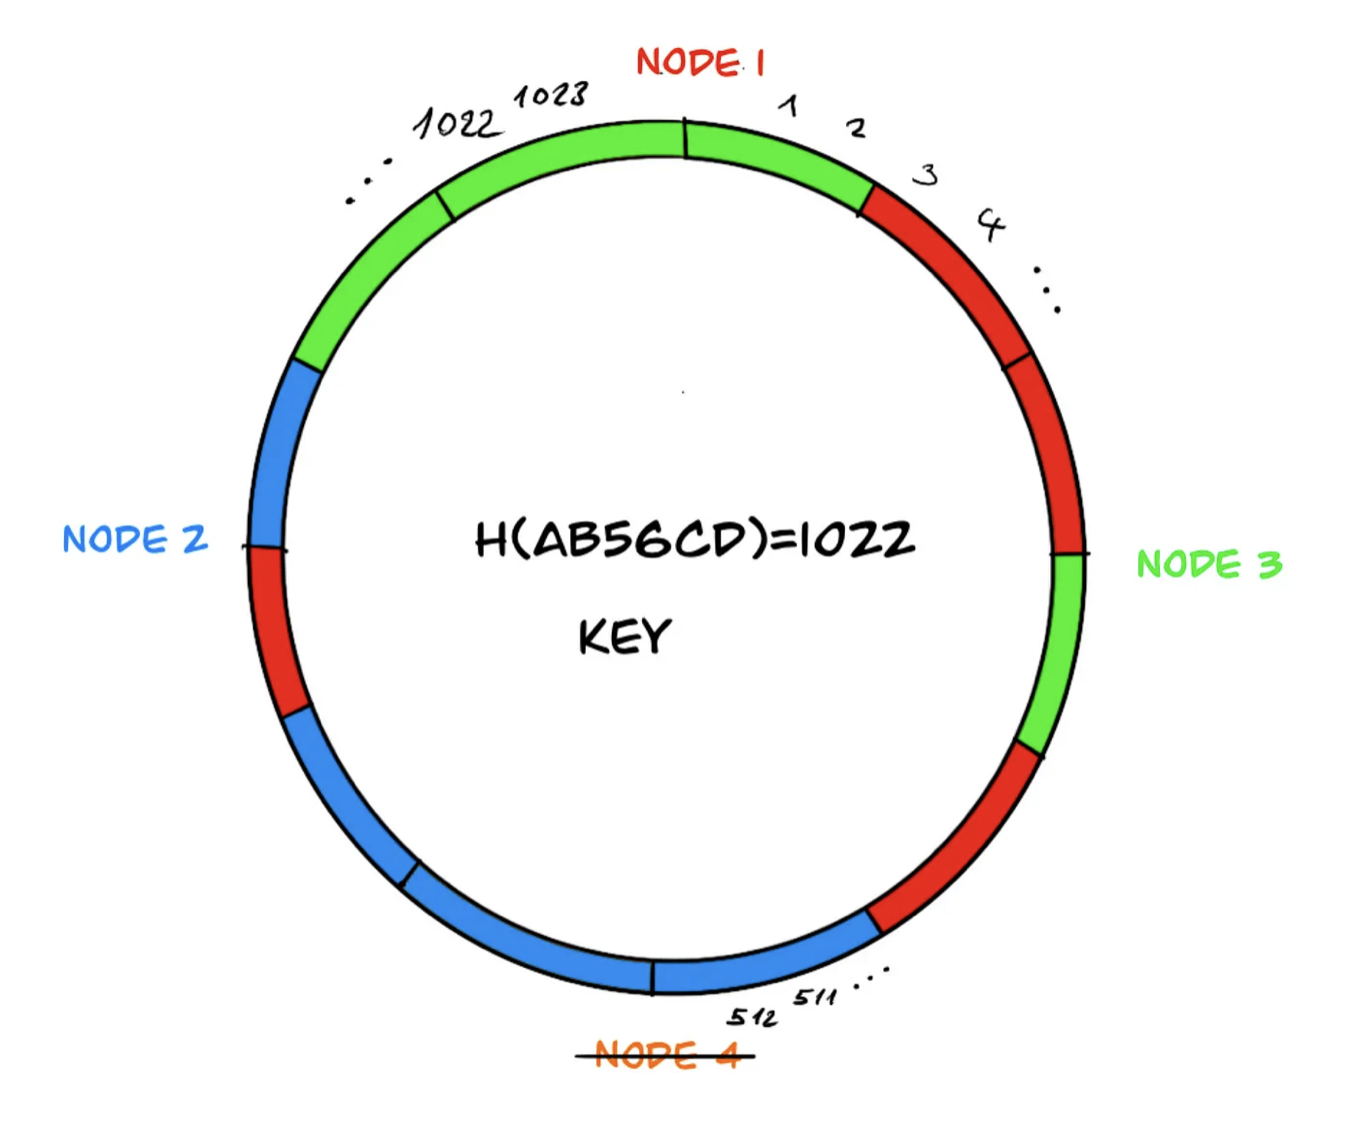
However, in the load distribution mentioned above, the neighboring system component, node 3, may end up with a heavier load during the redistribution of data because it needs to take over the data of the offline component, node 4. To overcome this problem, virtual components are used in the ring, and the distribution of data on the components is rebalanced.</p>

<p><img src="/images/chr_g3.png" /></p>

<p>Similarly, if ‘node 4’ leaves the system due to a failure, the data managed by node 4 is more evenly distributed among the remaining three components:</p>

<p><img src="/images/chr_g4.png" /></p>

<p>Virtual components are an effective method for balancing the load distribution, but depending on the content of the data, they may not always be sufficient. Therefore, sometimes hotspots and imbalances can occur on the ring. These hotspots are undesirable as they create load imbalances. Despite the addition of virtual components, if there is still an imbalance in the load distribution, a variant of consistent hashing called ‘bounded-load’ can be considered as a solution with an upper limit.</p>

<h3 id="bounded-load-hash-ring">Bounded-Load Hash Ring</h3>

<p>In this variant, the capacity upper limits of the ring’s components are predetermined, and if the load exceeds this limit, the incoming load is transferred to the next node with available capacity. This prevents hotspot formation on the nodes. Although this method puts pressure on the ring to prevent hotspot formation, it introduces additional cost when redistributing the data. The decision to use this variant can be made when imbalance is observed in the production load distribution.</p>

<h3 id="in-conclusion">In conclusion…</h3>

<p>Consistent Hash Ring is a load distribution and balancing technique commonly encountered in database and cache implementations. This method allows us to horizontally scale the data across multiple components and increases fault tolerance as it only requires redistributing the affected data set among the remaining components in case of a node failure. However, depending on the changing number of nodes and the content of the data, the balanced distribution of the load on the nodes can be disrupted by creating hotspots. In such cases, another variant of Consistent Hashing called bounded-load can be used to limit and transfer the overloaded load to the next node.</p>

<h4 id="references">References</h4>
<ol>
  <li>https://ai.googleblog.com/2017/04/consistent-hashing-with-bounded-loads.html?m=1</li>
  <li>http://highscalability.com/blog/2023/2/22/consistent-hashing-algorithm.html</li>
  <li>https://web.stanford.edu/class/cs168/l/l1.pdf</li>
</ol>]]></content><author><name>erhan</name></author><category term="Cloud Computing" /><category term="Cloud Computing" /><category term="Distributed Systems" /><category term="Consistent Hasing" /><summary type="html"><![CDATA[Consistent Hash Ring is a widely used technique in the process of distributing and load balancing data or operational workload across multiple system components with high fault tolerance.]]></summary><media:thumbnail xmlns:media="http://search.yahoo.com/mrss/" url="http://localhost:4000/images/21.jpg" /><media:content medium="image" url="http://localhost:4000/images/21.jpg" xmlns:media="http://search.yahoo.com/mrss/" /></entry><entry><title type="html">Rate Limiting with Token Buckets</title><link href="http://localhost:4000/Rate-Limiting-with-Token-Buckets/" rel="alternate" type="text/html" title="Rate Limiting with Token Buckets" /><published>2022-06-01T10:41:50+02:00</published><updated>2022-06-01T10:41:50+02:00</updated><id>http://localhost:4000/Rate-Limiting-with-Token-Buckets</id><content type="html" xml:base="http://localhost:4000/Rate-Limiting-with-Token-Buckets/"><![CDATA[<p>In services landscape, rate limiting is not only a requirement to protect the available resources from getting exhausted and failing in the end, but it is also vital for attaining fair resource sharing among your users and also application clients. Sooner or later, as the business grows, you may want to implement a throttling mechanism eventually to slow down noisy neighbors to keep the throughput at the highest level while fulfilling latency requirements. In this article, we together will throw a quick look at one of the prevalent rate-limiting strategies in the application layer by example, which is the token bucket.</p>

<blockquote>
  <p>In this article I will demonstrate an example service implementation by using Spring Boot and Bucket4j. The article contains only the core components to keep it simple. The example project, we will walk through below, can be seen &gt;<a href="https://github.com/bagdemir/bucket4j-spring-redis-example">here</a>.</p>
</blockquote>

<h3 id="overview">Overview</h3>

<p>
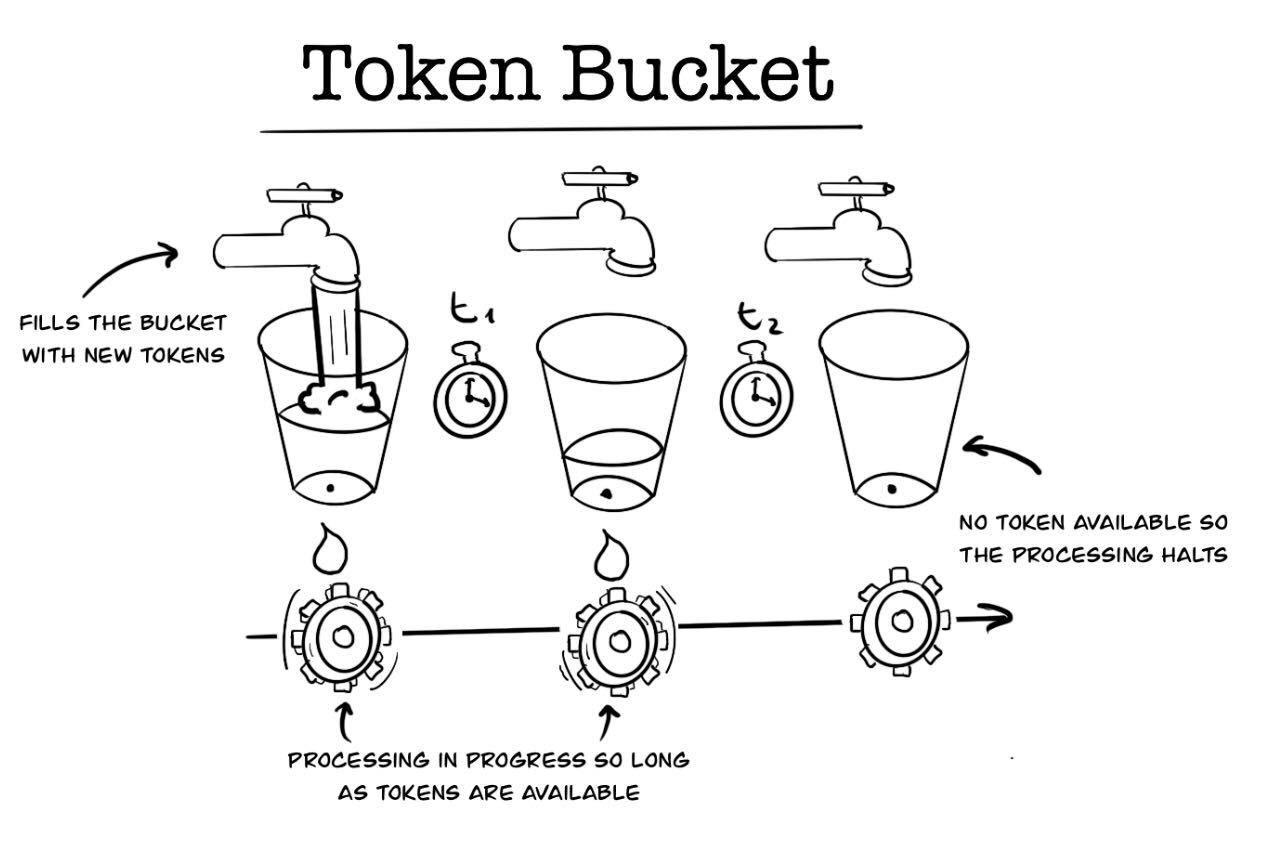
A token bucket is a container of tokens of which capacity or budget is limited for a certain amount of time. For incoming requests, tokens will be taken out of the bucket while refilling it again after a predefined period. If the tokens in bucket are exhausted, the service rejects subsequent requests so long as the bucket is refilled and has capacity again. To have throughput under control, it provides a limited number of tokens for a period which prevents users from surpassing limits of available resources what consequently might lead up to increased latency in service.
You may have noticed that a token bucket algorithm is quite similar to the fixed window throttling mechanism. Indeed, the difference between the token bucket and a fixed window rate limiter is slight. A fixed window rate limiter allows a strict throughput within a predefined period. However, token buckets also will enable you to control how fast a bucket can be refilled. The token bucket will act as a fixed window throttler if you keep the same fixed refill rate. One thing that neither a token bucket nor a fixed window rate-limiter cannot prevent is the burst (In a fixed-window rate limiter, if the request-burst overlaps the ending and beginning of two windows, the effect will even look worse. The sliding window rate limiter improves weakness of the fixed-window rate limiter by taking the previous window’s state into account.). Nevertheless, you can convert a token bucket into a leaky bucket while adding a fine-grained throughput controller, e.g., a maximum of one hundred requests per second whereas the bucket’s capacity has control over a more extended period.</p>

<p><img src="/images/token_bucket.jpeg" /></p>

<h3 id="distributed-token-bucket-withbucket4j">Distributed Token Bucket with Bucket4j</h3>

<p>
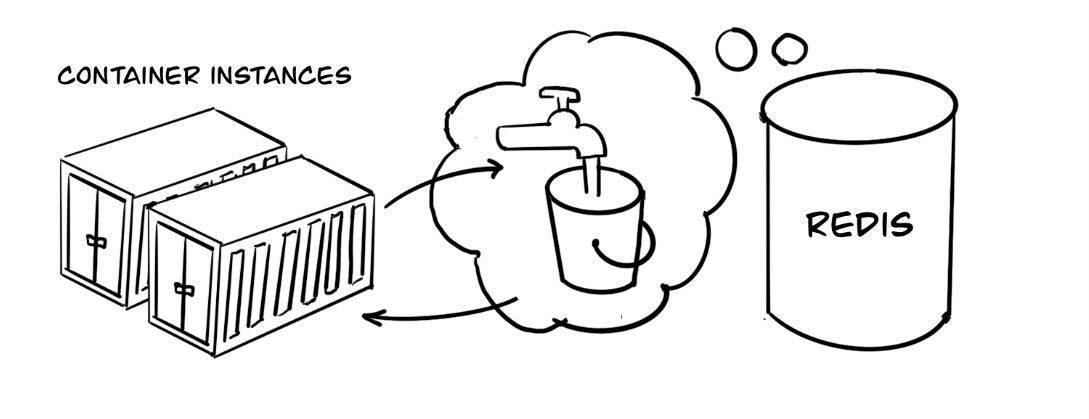
In the following example, I use Spring Boot framework and Redis to demonstrate a realistic cloud service implementation. The bucket state will be maintained in a database so that application instances can access this shared state and evaluate it every time as a request is being handled in the container. If your use case doesn’t require persistence, for example, what you need is to protect resource exhaustion on a single instance, you may want to omit the database option. However, suppose your use case requires tracking overall resource usage and implementing an enforcement mechanism, e.g., a quota 
management instance. In that case, you should evaluate persistence options to store the bucket state.</p>

<p><img src="/images/token_bucket2.jpeg" /></p>

<h3 id="implementation-as-a-spring-bootservice">Implementation as a Spring Boot Service</h3>

<p>Rate limiting should preferably operate before the business logic layer picks up the request to keep the domain-relevant implementation simple and lean. In Spring-based applications, it can be implemented, for instance, as a handler interceptor, which pre-and-post processes the requests. The interceptor verifies the access limits by delegating the call to the rate limiter component. Once the limit is exceeded, the rate limiter and the interceptor, respectively, reject subsequent requests with HTTP 429 “Too many requests” immediately - and it is also a good practice to include a Retry-After header to let clients know when they should come back for the next request:</p>

<div class="language-java highlighter-rouge"><div class="highlight"><pre class="highlight"><code><table class="rouge-table"><tbody><tr><td class="rouge-gutter gl"><pre class="lineno">1
2
3
4
5
6
7
8
9
10
11
12
13
14
15
</pre></td><td class="rouge-code"><pre><span class="kd">public</span> <span class="kt">boolean</span> <span class="nf">preHandle</span><span class="o">(</span>
    <span class="n">HttpServletRequest</span> <span class="n">request</span><span class="o">,</span>
    <span class="n">HttpServletResponse</span> <span class="n">response</span><span class="o">,</span>
    <span class="n">Object</span> <span class="n">handler</span><span class="o">)</span> <span class="o">{</span>

    <span class="n">Map</span><span class="o">&lt;</span><span class="n">String</span><span class="o">,</span> <span class="n">String</span><span class="o">&gt;</span> <span class="n">pathVars</span> <span class="o">=</span> <span class="o">(</span><span class="n">Map</span><span class="o">&lt;</span><span class="n">String</span><span class="o">,</span> <span class="n">String</span><span class="o">&gt;)</span>
       <span class="n">request</span><span class="o">.</span><span class="na">getAttribute</span><span class="o">(</span><span class="n">HandlerMapping</span><span class="o">.</span><span class="na">URI_TEMPLATE_VARIABLES_ATTRIBUTE</span><span class="o">);</span>

    <span class="k">if</span> <span class="o">(!</span><span class="n">rateLimiter</span><span class="o">.</span><span class="na">tryAccess</span><span class="o">(</span><span class="n">pathVars</span><span class="o">.</span><span class="na">get</span><span class="o">(</span><span class="n">USER_ID</span><span class="o">)))</span> <span class="o">{</span>
        <span class="n">response</span><span class="o">.</span><span class="na">setStatus</span><span class="o">(</span><span class="n">TOO_MANY_REQUEST</span><span class="o">);</span>
        <span class="n">response</span><span class="o">.</span><span class="na">setHeader</span><span class="o">(</span><span class="n">RETRY_AFTER</span><span class="o">,</span> <span class="n">IN_300_SECS</span><span class="o">);</span>
        <span class="k">return</span> <span class="kc">false</span><span class="o">;</span>
    <span class="o">}</span>
    <span class="k">return</span> <span class="kc">true</span><span class="o">;</span>
<span class="o">}</span>
</pre></td></tr></tbody></table></code></pre></div></div>
<p><br />
The RateLimiter service below provides its clients with a “tryAccess()” method, of which call queries the underlying bucket with a key. Since we maintain a token bucket per key, e.g., in our scenario, a user identifier, we need to pass it to the proxy manager so that the corresponding token bucket can be looked up in the database:</p>

<div class="language-java highlighter-rouge"><div class="highlight"><pre class="highlight"><code><table class="rouge-table"><tbody><tr><td class="rouge-gutter gl"><pre class="lineno">1
2
3
4
5
6
7
8
9
10
11
12
13
14
15
16
17
</pre></td><td class="rouge-code"><pre><span class="kd">public</span> <span class="kd">class</span> <span class="nc">RateLimiter</span> <span class="o">{</span>
    <span class="kd">private</span> <span class="kd">final</span> <span class="n">RedissonBasedProxyManager</span> <span class="n">redissonBasedProxyManager</span><span class="o">;</span>
    <span class="kd">private</span> <span class="kd">final</span> <span class="n">BucketConfiguration</span> <span class="n">bucketConfiguration</span><span class="o">;</span>

    <span class="kd">public</span> <span class="nf">RateLimiter</span><span class="o">(</span><span class="n">RedissonBasedProxyManager</span> <span class="n">redissonBasedProxyManager</span><span class="o">,</span>
                       <span class="n">BucketConfiguration</span> <span class="n">bucketConfiguration</span><span class="o">)</span> <span class="o">{</span>
        <span class="k">this</span><span class="o">.</span><span class="na">redissonBasedProxyManager</span> <span class="o">=</span> <span class="n">redissonBasedProxyManager</span><span class="o">;</span>
        <span class="k">this</span><span class="o">.</span><span class="na">bucketConfiguration</span> <span class="o">=</span> <span class="n">bucketConfiguration</span><span class="o">;</span>
    <span class="o">}</span>

    <span class="kd">public</span> <span class="kt">boolean</span> <span class="nf">tryAccess</span><span class="o">(</span><span class="n">String</span> <span class="n">key</span><span class="o">)</span> <span class="o">{</span>
        <span class="k">return</span> <span class="n">redissonBasedProxyManager</span>
                <span class="o">.</span><span class="na">builder</span><span class="o">()</span>
                <span class="o">.</span><span class="na">build</span><span class="o">(</span><span class="n">key</span><span class="o">,</span> <span class="n">bucketConfiguration</span><span class="o">)</span>
                <span class="o">.</span><span class="na">tryConsume</span><span class="o">(</span><span class="mi">1</span><span class="o">);</span>
    <span class="o">}</span>
<span class="o">}</span>
</pre></td></tr></tbody></table></code></pre></div></div>
<p><br />
RedissonBasedProxyManager ➋ is the proxy implementation for Redis-backed token buckets, that is provided by Bucket4j. It will store by BucketConfiguration ➌ configured token bucket’s state in Redis. Both components are Spring Beans and injected to RateLimiter, which is also managed by IoC container:</p>

<div class="language-java highlighter-rouge"><div class="highlight"><pre class="highlight"><code><table class="rouge-table"><tbody><tr><td class="rouge-gutter gl"><pre class="lineno">1
2
3
4
5
6
7
8
9
10
11
12
13
14
15
16
17
18
19
20
21
22
23
24
25
26
27
28
29
30
31
32
33
34
</pre></td><td class="rouge-code"><pre><span class="nd">@EnableWebMvc</span>
<span class="nd">@Configuration</span>
<span class="nd">@EnableCaching</span>
<span class="kd">public</span> <span class="kd">class</span> <span class="nc">AppConfig</span> <span class="kd">implements</span> <span class="n">WebMvcConfigurer</span> <span class="o">{</span>

    <span class="nd">@Bean</span>
    <span class="kd">public</span> <span class="n">RateLimiter</span> <span class="nf">rateLimiter</span><span class="o">()</span> <span class="kd">throws</span> <span class="n">IOException</span> <span class="o">{</span>
        <span class="k">return</span> <span class="k">new</span> <span class="nf">RateLimiter</span><span class="o">(</span><span class="n">proxyManager</span><span class="o">(),</span> <span class="n">bucketConfiguration</span><span class="o">());</span>
    <span class="o">}</span>

    <span class="nd">@Bean</span><span class="o">(</span><span class="n">destroyMethod</span> <span class="o">=</span> <span class="s">"shutdown"</span><span class="o">)</span>
    <span class="kd">public</span> <span class="n">ConnectionManager</span> <span class="nf">redissonConnectionManager</span><span class="o">()</span> <span class="kd">throws</span> <span class="n">IOException</span> <span class="o">{</span>
        <span class="n">File</span> <span class="n">resourceURL</span> <span class="o">=</span> <span class="n">ResourceUtils</span><span class="o">.</span><span class="na">getFile</span><span class="o">(</span><span class="s">"classpath:redis.yml"</span><span class="o">);</span>
        <span class="n">Config</span> <span class="n">config</span> <span class="o">=</span> <span class="n">Config</span><span class="o">.</span><span class="na">fromYAML</span><span class="o">(</span><span class="n">resourceURL</span><span class="o">);</span>
        <span class="k">return</span> <span class="n">ConfigSupport</span><span class="o">.</span><span class="na">createConnectionManager</span><span class="o">(</span><span class="n">config</span><span class="o">);</span>
    <span class="o">}</span>

    <span class="nd">@Bean</span>
    <span class="kd">public</span> <span class="n">RedissonBasedProxyManager</span> <span class="nf">proxyManager</span><span class="o">()</span> <span class="kd">throws</span> <span class="n">IOException</span> <span class="o">{</span>
        <span class="n">CommandSyncService</span> <span class="n">commandSyncService</span> <span class="o">=</span> 
            <span class="k">new</span> <span class="nf">CommandSyncService</span><span class="o">(</span><span class="n">redissonConnectionManager</span><span class="o">());</span>
        <span class="k">return</span> <span class="k">new</span> <span class="nf">RedissonBasedProxyManager</span><span class="o">(</span><span class="n">commandSyncService</span><span class="o">,</span>
                <span class="n">ClientSideConfig</span><span class="o">.</span><span class="na">getDefault</span><span class="o">(),</span>
                <span class="n">Duration</span><span class="o">.</span><span class="na">ofMinutes</span><span class="o">(</span><span class="mi">10</span><span class="o">));</span>
    <span class="o">}</span>

    <span class="nd">@Bean</span>
    <span class="kd">public</span> <span class="n">BucketConfiguration</span> <span class="nf">bucketConfiguration</span><span class="o">()</span> <span class="o">{</span>
        <span class="k">return</span> <span class="n">BucketConfiguration</span>
            <span class="o">.</span><span class="na">builder</span><span class="o">()</span>
            <span class="o">.</span><span class="na">addLimit</span><span class="o">(</span><span class="n">Bandwidth</span><span class="o">.</span><span class="na">simple</span><span class="o">(</span><span class="mi">2</span><span class="o">,</span> <span class="n">Duration</span><span class="o">.</span><span class="na">ofSeconds</span><span class="o">(</span><span class="mi">1</span><span class="o">)).</span><span class="na">withInitialTokens</span><span class="o">(</span><span class="mi">2</span><span class="o">))</span>
            <span class="o">.</span><span class="na">build</span><span class="o">();</span>
    <span class="o">}</span>
<span class="o">}</span>
</pre></td></tr></tbody></table></code></pre></div></div>
<p><br />
Above, the bucket configuration instantiates a Bucket4j token bucket configuration, which has the bandwidth of two tokens, and it is refilled every two seconds while being consumed by one token with every request.</p>

<h3 id="conclusion">Conclusion</h3>

<p>Even though the general approach to implementing a bucket token is by reducing buckets by one token for each request, your use case may require removing more than one token depending on API group, for instance, to apply stricter limits to requests on resource-consuming APIs. However, this might introduce more sophisticated policy control requirements while considering resource requirements of different APIs, different types of user contracts, central authority of bucket configurations, etc. So, depending on the problem you are trying to solve, some contract-based quota management vs. throttling to protect server-side resources, the architecture can be enhanced with additional components.
Token bucket is quite simple but handy algorithm that can be used to implement for throttling requests in web services to protect server-side resources while enabling a fair resource sharing by limiting the noisy neighbors. With the F/OSS frameworks like Bucket4j, it is also quite straightforward to integrate with existing service architecture. You can also leverage it to implement e.g. quota management according to some license-based policies, which are incorporated with your business requirements. One thing that it cannot prevent is the request burst. Yet you can streamline the implementation with additional limitation e.g. maximum request per time unit, what would then behave like a leaky bucket in a sense.</p>]]></content><author><name>erhan</name></author><category term="Web Services" /><category term="featured" /><summary type="html"><![CDATA[In services landscape, rate limiting is not only a requirement to protect the available resources from getting exhausted and failing in the end, but it is also vital for attaining fair resource sharing among your users and also application clients.]]></summary><media:thumbnail xmlns:media="http://search.yahoo.com/mrss/" url="http://localhost:4000/images/18.jpg" /><media:content medium="image" url="http://localhost:4000/images/18.jpg" xmlns:media="http://search.yahoo.com/mrss/" /></entry><entry><title type="html">Writing documentation, we struggle with</title><link href="http://localhost:4000/Documentation-Writing/" rel="alternate" type="text/html" title="Writing documentation, we struggle with" /><published>2021-12-22T09:41:50+01:00</published><updated>2021-12-22T09:41:50+01:00</updated><id>http://localhost:4000/Documentation-Writing</id><content type="html" xml:base="http://localhost:4000/Documentation-Writing/"><![CDATA[<p>Writing documentation is not an easy task. It is sometimes more challenging - and not that spectacular, than writing source code since we as developers are trained how to deal with computers, but we may not know how people work. Therefore, when it comes to writing documentation, we are usually reluctant. However, it is not that we as engineers underestimate this perpetual activity; in contrast, we may potentially be scared of it. With this article, I will briefly highlight a few essential points about making this process easier before writing activity leads to a dead end and we give up, finally. The checkpoints I noticed helped me a lot to create consistent documentation. First, let’s start with the purpose.</p>

<h3 id="dont-mix-the-purpose">Don’t mix the purpose</h3>

<p>Having a clear purpose for writing would keep your composition lean and cohesive. For instance, reference documentation is a guide to the code of which goal is to explain its usage of it, and it should remain as a reference document without attempting to convey more information than its intent at the same time. Mostly, readers have clear goals as they’re seeking through documentation, such as knowing how to use an API, how to integrate a library, how authentication works, and so on. So, we should give them what they need. State the purpose of the documentation at the beginning of the text clearly to align expectations with your audience.</p>

<p>Before you start writing, you can ask questions yourselves like, “why am I writing this?”, “What is the purpose of it?” to nail the right documentation type. Do you want to explain the usage of the source code? Then what you need is reference documentation. A step-by-step guide to accomplish a task? It sounds like a tutorial. Is it about architecture, the interaction of sub-systems, etc.? It sounds like a design document. The important thing is not to meld them in a single pot.</p>

<h3 id="know-your-audience">Know your Audience</h3>

<p>I noticed engineers’ tendency to easily take it for granted that the audience must be at the same knowledge and experience level. As a result, they automatically take shortcuts while explaining complex topics. This impatience attitude may cause readers to lose focus as they can’t follow the subject due to a potential level mismatch. The other way around is also problematic. The text becomes quickly boring for advanced readers if written at the novice level. So, it is always a good idea to scope the level of readers in the introduction section and give a hint about the level of the content at the beginning of the document as prerequisites.</p>

<h3 id="maintaining-documentation">Maintaining Documentation</h3>

<p>Unmaintained, abandoned-look documentation will be quickly discarded by people faster than unmaintained source code. There are a few reasons why engineers have absolutely no understanding of outdated or broken documentations. First, we are eager to see the source code. Reading source code is more intuitive to us, and the code constitutes a source of truth. Second, we have strong prejudices about the currency of documentations. Documentations will be skimmed through briefly, and the first impression is vital for the fate of the text. Any broken link, imprecision in text, and overcomplicated diagrams may lead to them being abandoned faster than you think. Thus, it is always a good idea to keep your documentation up to date and let your readers know that your documentation is regularly updated by adding freshness date, revision, etc., marker.</p>

<h3 id="location">Location</h3>

<p>It is also wise to put your documentation under version control and treat them as source code. Creating pull requests for changes and following the already entrenched software review process, etc., would certainly help improve the quality assurance in the first place. If you need to add diagrams to your documentation, you can consider using “diagram as code” tools like Plant UML to bring them under version control. However, some documentation types are not necessarily that technical as they don’t relate to implementation directly but to some design discussions or high-level project discussions. I would recommend separating such documentation from the project’s base and hiding it from our audience for clarity.</p>

<h3 id="when-not-write-documentation">When not write Documentation</h3>

<p>Before actual implementation begins, there are activities like high-level project meetings and commitment planning where the capacity requirements and business priorities will be explored. Sometimes, we must deliver rough estimates at this level that will be considered in the decision-making process, e.g., while sequencing the milestones and defining roadmaps. Therefore, it might be wise to take quick notes from our discussions with technical leads to track the path down to our decisions and not invest so much time into a writing activity because it might not be apparent at this stage if the project is officially planned for the next quarter, year, etc. So, I tend to put my notes into informal wiki pages to make the outcome from high-level project meetings accountable of which pieces I re-use in requirements analysis later.</p>

<h3 id="conclusion">Conclusion</h3>

<p>Writing documentation is an essential part of our job and engineering activity. We create documentation for different purposes, including sharing knowledge, creating historical records for our decisions, helping our clients use our products, and so on. Writing documentation is a long-term investment but certainly not a one-time. Documentations need to be maintained as software evolves. To keep them consistent and cohesive, they should serve a single purpose and be aligned with our target audience’s experience and knowledge level. Follow the same review process in software development and put the documentations right next to source code under version control. So, by leveraging entrenched techniques, we can also ensure quality assurance for them.</p>

<div style="font-size:9px; font-color:#EFEFEF; ">Rev 1.0 2021, 22nd Dec</div>]]></content><author><name>erhan</name></author><category term="Software Engineering" /><category term="sticky" /><summary type="html"><![CDATA[Writing documentation is not an easy task. It is sometimes more challenging - and not that spectacular, than writing source code since we as developers are trained how to deal with computers, but we may not know how people work.]]></summary><media:thumbnail xmlns:media="http://search.yahoo.com/mrss/" url="http://localhost:4000/images/22.png" /><media:content medium="image" url="http://localhost:4000/images/22.png" xmlns:media="http://search.yahoo.com/mrss/" /></entry><entry><title type="html">Responsive Terminal Applications in Golang</title><link href="http://localhost:4000/Responsive-Terminal-Applications/" rel="alternate" type="text/html" title="Responsive Terminal Applications in Golang" /><published>2021-05-08T18:41:50+02:00</published><updated>2021-05-08T18:41:50+02:00</updated><id>http://localhost:4000/Responsive-Terminal-Applications</id><content type="html" xml:base="http://localhost:4000/Responsive-Terminal-Applications/"><![CDATA[<p>While developing a terminal application with Golang, I recently struggled with the implementation of a feature, that was the responsiveness of the terminal application to window size changes. The task was to re-draw my ASCII UI whenever the terminal window get resized. Fortunately, POSIX compliant operating systems send a proper signal to notify the process, that is SIGWINCH and to write a signal handler in Golang is pretty straightforward:</p>

<div class="language-go highlighter-rouge"><div class="highlight"><pre class="highlight"><code><table class="rouge-table"><tbody><tr><td class="rouge-gutter gl"><pre class="lineno">1
2
3
4
5
6
7
8
9
10
11
12
</pre></td><td class="rouge-code"><pre><span class="c">// ListenSIG listens to SIGWINCH syscall to react on window size changes.</span><span class="x">
</span><span class="k">func</span><span class="x"> </span><span class="p">(</span><span class="n">w</span><span class="x"> </span><span class="o">*</span><span class="n">Window</span><span class="p">)</span><span class="x"> </span><span class="n">ListenSIG</span><span class="p">()</span><span class="x"> </span><span class="p">{</span><span class="x">
  </span><span class="k">go</span><span class="x"> </span><span class="k">func</span><span class="p">()</span><span class="x"> </span><span class="p">{</span><span class="x">
    </span><span class="k">for</span><span class="x"> </span><span class="p">{</span><span class="x">
      </span><span class="n">c</span><span class="x"> </span><span class="o">:=</span><span class="x"> </span><span class="nb">make</span><span class="p">(</span><span class="k">chan</span><span class="x"> </span><span class="n">os</span><span class="o">.</span><span class="n">Signal</span><span class="p">,</span><span class="x"> </span><span class="m">1</span><span class="p">)</span><span class="x">
      </span><span class="n">signal</span><span class="o">.</span><span class="n">Notify</span><span class="p">(</span><span class="n">c</span><span class="p">,</span><span class="x"> </span><span class="n">syscall</span><span class="o">.</span><span class="n">SIGWINCH</span><span class="p">)</span><span class="x">
      </span><span class="c">// Block until a signal is received.</span><span class="x">
      </span><span class="o">&lt;-</span><span class="n">c</span><span class="x">
      </span><span class="n">w</span><span class="o">.</span><span class="n">Render</span><span class="p">()</span><span class="x">
    </span><span class="p">}</span><span class="x">
  </span><span class="p">}()</span><span class="x">
</span><span class="p">}</span><span class="x">
</span></pre></td></tr></tbody></table></code></pre></div></div>
<p><br />
In the example above, I create a new channel to catch the system calls within a go routine. Since the current thread gets blocked and I don’t want whole application to stop while while listening to signals, I put the signal handling code into its own gorouting. By doing so, my code is able to listen to window size change signals and call Render() function of my application’s window infinitely while processing other tasks.</p>

<p>Another way to implement a similar feature is by polling the current terminal window size. I don’t think, however, that this approach would be as efficient as the former one, if you are not able to take signal-handler-approach otherwise,</p>

<div class="language-go highlighter-rouge"><div class="highlight"><pre class="highlight"><code><table class="rouge-table"><tbody><tr><td class="rouge-gutter gl"><pre class="lineno">1
2
3
4
5
6
7
8
9
10
11
12
13
14
15
16
17
18
19
20
</pre></td><td class="rouge-code"><pre><span class="c">// Private types</span><span class="x">
</span><span class="k">type</span><span class="x"> </span><span class="n">screenSize</span><span class="x"> </span><span class="k">struct</span><span class="x"> </span><span class="p">{</span><span class="x">
  </span><span class="n">Row</span><span class="x">    </span><span class="kt">uint16</span><span class="x">
  </span><span class="n">Col</span><span class="x">    </span><span class="kt">uint16</span><span class="x">
  </span><span class="n">Xpixel</span><span class="x"> </span><span class="kt">uint16</span><span class="x">
  </span><span class="n">Ypixel</span><span class="x"> </span><span class="kt">uint16</span><span class="x">
</span><span class="p">}</span><span class="x">

</span><span class="k">func</span><span class="x"> </span><span class="n">GetScreenSize</span><span class="p">()</span><span class="x"> </span><span class="p">(</span><span class="kt">uint16</span><span class="p">,</span><span class="x"> </span><span class="kt">uint16</span><span class="p">)</span><span class="x"> </span><span class="p">{</span><span class="x">
  </span><span class="n">ws</span><span class="x"> </span><span class="o">:=</span><span class="x"> </span><span class="nb">new</span><span class="p">(</span><span class="n">screenSize</span><span class="p">)</span><span class="x">
  </span><span class="n">retCode</span><span class="p">,</span><span class="x"> </span><span class="n">_</span><span class="p">,</span><span class="x"> </span><span class="n">errno</span><span class="x"> </span><span class="o">:=</span><span class="x"> </span><span class="n">syscall</span><span class="o">.</span><span class="n">Syscall</span><span class="p">(</span><span class="n">syscall</span><span class="o">.</span><span class="n">SYS_IOCTL</span><span class="p">,</span><span class="x">
    </span><span class="kt">uintptr</span><span class="p">(</span><span class="n">syscall</span><span class="o">.</span><span class="n">Stdin</span><span class="p">),</span><span class="x">
    </span><span class="kt">uintptr</span><span class="p">(</span><span class="n">syscall</span><span class="o">.</span><span class="n">TIOCGWINSZ</span><span class="p">),</span><span class="x">
    </span><span class="kt">uintptr</span><span class="p">(</span><span class="n">unsafe</span><span class="o">.</span><span class="n">Pointer</span><span class="p">(</span><span class="n">ws</span><span class="p">)))</span><span class="x">

  </span><span class="k">if</span><span class="x"> </span><span class="kt">int</span><span class="p">(</span><span class="n">retCode</span><span class="p">)</span><span class="x"> </span><span class="o">==</span><span class="x"> </span><span class="o">-</span><span class="m">1</span><span class="x"> </span><span class="p">{</span><span class="x">
    </span><span class="nb">panic</span><span class="p">(</span><span class="n">errno</span><span class="p">)</span><span class="x">
  </span><span class="p">}</span><span class="x">
  </span><span class="k">return</span><span class="x"> </span><span class="n">ws</span><span class="o">.</span><span class="n">Row</span><span class="p">,</span><span class="x"> </span><span class="n">ws</span><span class="o">.</span><span class="n">Col</span><span class="x">
</span><span class="p">}</span><span class="x">
</span></pre></td></tr></tbody></table></code></pre></div></div>
<p><br />
The GetScreenSize function sends a system call to Ioctls for terminals and serial lines to find out the current screen size of the terminal, by passing the TIOCGWINSZ. The return value will be stored in an struct. This way, you can determine the current terminal window size and repeat this call, for instance, every a few seconds to capture the window size changes.</p>]]></content><author><name>erhan</name></author><category term="Programming Techniques" /><category term="Golang" /><summary type="html"><![CDATA[While developing a terminal application with Golang, I recently struggled with the implementation of a feature, that was the responsiveness of the terminal application to window size changes.]]></summary><media:thumbnail xmlns:media="http://search.yahoo.com/mrss/" url="http://localhost:4000/images/24.png" /><media:content medium="image" url="http://localhost:4000/images/24.png" xmlns:media="http://search.yahoo.com/mrss/" /></entry><entry><title type="html">A Guide to OAuth for RESTful Webservices</title><link href="http://localhost:4000/OAuth-Guide-for-Restful-Services/" rel="alternate" type="text/html" title="A Guide to OAuth for RESTful Webservices" /><published>2020-12-20T17:41:50+01:00</published><updated>2020-12-20T17:41:50+01:00</updated><id>http://localhost:4000/OAuth-Guide-for-Restful-Services</id><content type="html" xml:base="http://localhost:4000/OAuth-Guide-for-Restful-Services/"><![CDATA[<p>As service architecture evolves, new services may join your enterprise services landscape. The question, “which service is authorized to run operations in the back-end?”, needs to find an answer. Managing authorization on protected resources without sharing user credentials on whose behalf the operation is being executed, among all services, becomes crucial, but I doubt it is a trivial task. Thus, understanding OAuth 2.0 so as to manage authorization and control user access on REST resources is an essential part of enterprise application development. Fortunately, there are frameworks like Spring Security - and Spring-Security-OAuth in Java stack, which provide a solid foundation, that simplifies this task, but still integration of authorization framework in an enterprise application might be tedious work. Our goal in this article will be understanding the fundamental concepts of the OAuth 2.0 protocol and in addition, step-by-step  implementing a backend with its components.</p>

<p>Before we get started with OAuth, I briefly want to brush up on the topic first, “Authentication, Authorization and Access Control”. Authentication verifies your identity. It is the same procedure if you show your ID to authorities so that they are able to know who they are talking to. Authentication by Username/Password pair (and along with 2FA) is a broadly adopted method, today. Authorization is there to ensure if an access is authorized to the requestor, who has already been authenticated, for instance if you possess a driver license you are authorized to drive a car, while access control does manage the permissions/privileges.</p>

<h2 id="oauth-20-in-a-nutshell">OAuth 2.0 in a Nutshell</h2>

<p>OAuth 2.0 is an authorization protocol standardized under RFC 6749 within the IETF as an open standard, of which purpose is to specify user-and-client authorization on protected resources without sharing their credentials with each other. The roles defined in OAuth are:
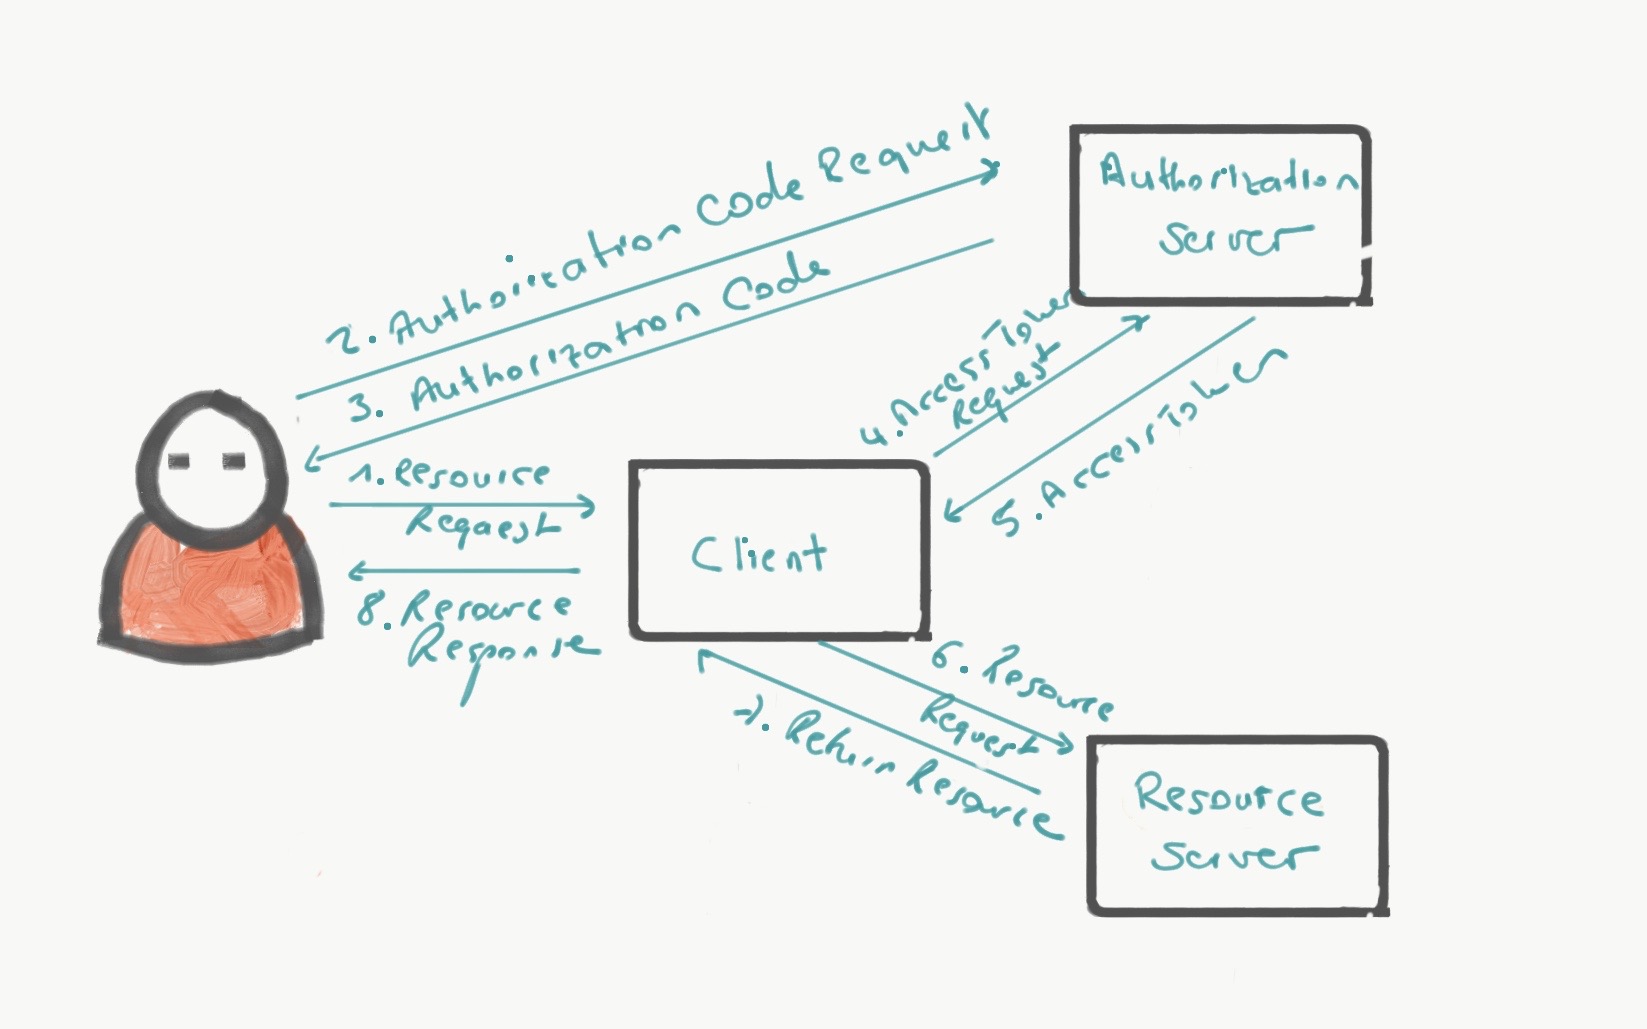
</p>

<p><strong>Resource owner</strong>, that is the end-user who owns resources of interest, that is hosted by resource server, <strong>the client</strong>, the application which claims access on resource owner’s (user’s) protected resources and perform some operations on behalf of the user and <strong>authorization server</strong> which manages user and client authentication and authorization by exchanging user credentials with authorization code and access tokens. The authorization workflow is initiated by the client, that is the application requesting access on resource owner’s resources on behalf of a user, e.g a mobile app. <strong>Resource server</strong> is the server which hosts the protected resources. It only accepts the requests with a valid access token. The authorization server is the one which issues access tokens (and authorization codes depending on the grant type) to the clients after a successful authentication.</p>

<p><img src="/images/IMG_0155.jpeg" alt="Project structure" class="center-image" /></p>

<p><strong>Figure - 1: OAuth 2.0 Workflow with grant type “authorization code”</strong></p>

<h3 id="access-token">Access Token</h3>

<p>Access tokens are credentials, that are issued to clients by authorization server, allowing them to access protected resources. Access tokens are valid till they expire and may be effective in a pre-defined scope,  in which the client is allowed to operate e.g read-scope, read-write scope, private scope, etc. By using access tokens in client and server communication, we eliminate the need of sharing resource owner’s credentials, so client applications like mobile apps do not need to memorize user’s credentials, at all.</p>

<p>The other token type is the refresh token. Refresh token is only used to obtain a new access token before the access token expires. Once a client application is authorized, there is no need to re-authenticate the user, everytime the access token expires if it has a refresh token. In this case, the client may use the refresh token that is returned from the authorization server along with the access token to obtain a new access token from the authorization server.</p>

<h3 id="authorization-grants">Authorization Grants</h3>

<p>In OAuth 2.0 world, the main motivation is, “Do not share user’s credentials with clients”. The application, that is the client, may be a native one to OS, or some JavaScript application that is run by browser. Depending on the degree of the trust between client and user, the client application may ask user’s credentials to obtain access token from authorization server without having an intermediate step as grant type “Resource Owner Password Credentials”. It requires, however, a higher degree of trust. Although the client is allowed to access user credentials over a short period of time, till it receives an access token from the authorization server.</p>

<p>On the other hand, the client might be another web service, and in this case the user will be redirected to the authorization server with a client id, an optional scope parameter and a redirection URI so that the user is able to authenticate on their own. A real-life example for this authentication flow is “Facebook integration” on Twitter. Twitter, the client, needs access to protected resources to post your recent tweets on your Facebook timeline. After a successful authentication process against Authorization Server, Facebook, the request will be redirected to the clients redirection URI (to Twitter) with an authorization code with which the client can request an access token from Authorization Server. In this “authorization code” grant, the client access to the user credentials is not permissible.</p>

<p>There are two more authorization grants, the “implicit” and the  “client credentials”. In the implicit workflow, the user-agent has to be redirected to the client with an access token, instead of using an auth code and without requiring the client to get authenticated with an auth code. Yor are probably familiar with this grant type from JavaScript web applications. Moreover, authorization-grant with “client credentials” requires the client to authenticate itself with its own credentials. This type of authorization grant is useful, in case, the client is the resource owner and defines the scope of access.</p>

<h3 id="scopes">Scopes</h3>

<p>Scope defines the boundaries of the authorization request. The authorisation server may enforce the clients to specify the scope while requesting access token in which scope the access token should be effective. <a href="https://tools.ietf.org/html/rfc6749#section-3.3">RFC 6749 3.3</a> Even though scopes are optional, they are essential in workflows and we will revisit them later.</p>

<p>In the next section, we are going to integrate these foundations with implementation so that resource owners are able to access their resources while unauthorized access can be denied. To do this, we use Spring framework which provides an annotation-based programming model to incorporate OAuth 2.0 concepts with services declaratively.</p>

<h2 id="building-the-backend">Building the Backend</h2>

<p>So far we have covered the groundwork about OAuth 2.0, that is required to understand the concepts which we use to build our authorization and authentication backend. Next step, we are going to start creating the components like Authorization Server, Resource Server, and so on. The backend, I am giving as example here, is part of a hypothetical book webshop so as to store book reviews. It means, there will be users who require access to write some reviews while other users will only need read access to view the reviews.</p>

<p>The sample application, we are building here, is a Spring Boot Application so we can start the container either by running the Spring Boot Maven plugin in the command line or as Java executable by running the main method, e.g, in an IDE - another approach would be by hitting java jar command if the application has already been packaged in JAR file. Moreover, the application is backed by a MySQL database so that the user credentials can be persisted. I am going to set up a docker container environment to start the entire back-end on my local computer. Dockerization will speed up “development and test cycle” and once we decide to deploy our back-end, it is much easier to roll the services out onto a container orchestration platform like Mesos or Kubernetes.</p>

<p>
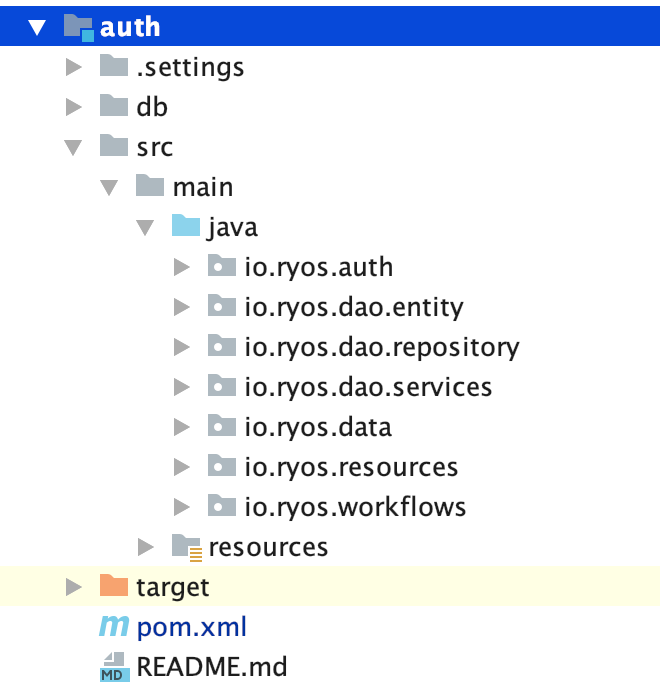
To build the backend, we will create a new Maven project from scratch while adding Spring Boot parent into the project’s POM which ensures the right versions of dependencies get included. For the sake of ease, I will create a single project which includes both the Resource and the Authorization Server in the same application, but in production, you may want to split them into two separate services, depending on the scale. For this purpose, I used the <a href="mvn archetype:generate -DarchetypeGroupId=org.apache.maven.archetypes -DarchetypeArtifactId=maven-archetype-quickstart -DarchetypeVersion=1.2-SNAPSHOT">Maven simple project archetype</a> and the files are organized in classical Maven project structure, i.e we have the Java packages in src/main/java and resources like configurations, etc. in src/main/resources source directories.</p>

<p><img src="/images/project_structure.png" alt="Project structure" width="250px" class="center-image" /></p>

<p><strong>Figure - 2 : Project’s structure</strong></p>

<p>The Figure 2 demonstrates the project structure we will work on throughout this article. I organized the classes in packages as follows: <code class="language-plaintext highlighter-rouge"><table class="rouge-table"><tbody><tr><td class="rouge-gutter gl"><pre class="lineno">1
</pre></td><td class="rouge-code"><pre>io.ryos.auth</pre></td></tr></tbody></table></code> is for Spring Boot application classes and configurations.<code class="language-plaintext highlighter-rouge"><table class="rouge-table"><tbody><tr><td class="rouge-gutter gl"><pre class="lineno">1
</pre></td><td class="rouge-code"><pre>io.ryos.dao</pre></td></tr></tbody></table></code> contains the classes for persistence layer, e.g entities, repositories (of Data Access Layer). <code class="language-plaintext highlighter-rouge"><table class="rouge-table"><tbody><tr><td class="rouge-gutter gl"><pre class="lineno">1
</pre></td><td class="rouge-code"><pre>io.ryos.data</pre></td></tr></tbody></table></code> has some value objects like UserProfile as a representation of the user file. <code class="language-plaintext highlighter-rouge"><table class="rouge-table"><tbody><tr><td class="rouge-gutter gl"><pre class="lineno">1
</pre></td><td class="rouge-code"><pre>io.ryos.resources</pre></td></tr></tbody></table></code> is where REST resources are located and the resources source directory to keep classpath files like configurations, properties-files, etc. The project’s POM resides in the root directory along with docker-compose.yml. The POM includes the Spring Boot’s starter parent:</p>

<figure class="highlight"><pre><code class="language-xml" data-lang="xml">    <span class="nt">&lt;parent&gt;</span>
        <span class="nt">&lt;groupId&gt;</span>org.springframework.boot<span class="nt">&lt;/groupId&gt;</span>
        <span class="nt">&lt;artifactId&gt;</span>spring-boot-starter-parent<span class="nt">&lt;/artifactId&gt;</span>
        <span class="nt">&lt;version&gt;</span>${spring.boot.version}<span class="nt">&lt;/version&gt;</span>
        <span class="nt">&lt;relativePath</span> <span class="nt">/&gt;</span>
    <span class="nt">&lt;/parent&gt;</span></code></pre></figure>

<p><strong>Example - 3 : Parent POM.</strong></p>

<p>We will also need the following dependencies to enable the Spring Framework in the project and some more dependencies mostly pertaining to Java persistence and MySQL driver:</p>

<figure class="highlight"><pre><code class="language-xml" data-lang="xml">    <span class="nt">&lt;dependencies&gt;</span>
        <span class="nt">&lt;dependency&gt;</span>
            <span class="nt">&lt;groupId&gt;</span>org.springframework.boot<span class="nt">&lt;/groupId&gt;</span>
            <span class="nt">&lt;artifactId&gt;</span>spring-boot-starter-web<span class="nt">&lt;/artifactId&gt;</span>
        <span class="nt">&lt;/dependency&gt;</span>
        <span class="nt">&lt;dependency&gt;</span>
            <span class="nt">&lt;groupId&gt;</span>org.springframework.boot<span class="nt">&lt;/groupId&gt;</span>
            <span class="nt">&lt;artifactId&gt;</span>spring-boot-starter-security<span class="nt">&lt;/artifactId&gt;</span>
        <span class="nt">&lt;/dependency&gt;</span>
        <span class="nt">&lt;dependency&gt;</span>
            <span class="nt">&lt;groupId&gt;</span>org.springframework.security.oauth<span class="nt">&lt;/groupId&gt;</span>
            <span class="nt">&lt;artifactId&gt;</span>spring-security-oauth2<span class="nt">&lt;/artifactId&gt;</span>
        <span class="nt">&lt;/dependency&gt;</span>
        <span class="nt">&lt;dependency&gt;</span>
            <span class="nt">&lt;groupId&gt;</span>org.springframework.boot<span class="nt">&lt;/groupId&gt;</span>
            <span class="nt">&lt;artifactId&gt;</span>spring-boot-starter-data-jpa<span class="nt">&lt;/artifactId&gt;</span>
        <span class="nt">&lt;/dependency&gt;</span>
        <span class="nt">&lt;dependency&gt;</span>
            <span class="nt">&lt;groupId&gt;</span>mysql<span class="nt">&lt;/groupId&gt;</span>
            <span class="nt">&lt;artifactId&gt;</span>mysql-connector-java<span class="nt">&lt;/artifactId&gt;</span>
        <span class="nt">&lt;/dependency&gt;</span>
        <span class="nt">&lt;dependency&gt;</span>
            <span class="nt">&lt;groupId&gt;</span>javax.persistence<span class="nt">&lt;/groupId&gt;</span>
            <span class="nt">&lt;artifactId&gt;</span>persistence-api<span class="nt">&lt;/artifactId&gt;</span>
        <span class="nt">&lt;/dependency&gt;</span>
    
        <span class="nt">&lt;dependency&gt;</span>
            <span class="nt">&lt;groupId&gt;</span>org.springframework.boot<span class="nt">&lt;/groupId&gt;</span>
            <span class="nt">&lt;artifactId&gt;</span>spring-boot-starter-test<span class="nt">&lt;/artifactId&gt;</span>
            <span class="nt">&lt;scope&gt;</span>test<span class="nt">&lt;/scope&gt;</span>
        <span class="nt">&lt;/dependency&gt;</span>
    <span class="nt">&lt;/dependencies&gt;</span></code></pre></figure>

<p><strong>Example - 4 : Project’s POM file.</strong></p>

<p>Note that, the first annotation, ➊ <code class="language-plaintext highlighter-rouge"><table class="rouge-table"><tbody><tr><td class="rouge-gutter gl"><pre class="lineno">1
</pre></td><td class="rouge-code"><pre>@SpringBootApplication</pre></td></tr></tbody></table></code>,  enables Spring Boot application and it takes an attribute, “scanBasePackages” with a list of package names in which Spring framework has to search for annotated Spring components and instantiate them. ➋ The <code class="language-plaintext highlighter-rouge"><table class="rouge-table"><tbody><tr><td class="rouge-gutter gl"><pre class="lineno">1
</pre></td><td class="rouge-code"><pre>@EnableJpaRepositories</pre></td></tr></tbody></table></code> is similar to @SpringBootApplication. It enables the Java Persistence (JPA), that is required to build the persistence layer. ➌ The third annotation is the <code class="language-plaintext highlighter-rouge"><table class="rouge-table"><tbody><tr><td class="rouge-gutter gl"><pre class="lineno">1
</pre></td><td class="rouge-code"><pre>@EnableTransactionManagement</pre></td></tr></tbody></table></code> which enables annotation-based Java transaction management (JTA). And the last annotation, ➍ @PropertySource defines the name of the configuration file in the classpath:</p>

<div class="language-java highlighter-rouge"><div class="highlight"><pre class="highlight"><code><table class="rouge-table"><tbody><tr><td class="rouge-gutter gl"><pre class="lineno">1
2
3
4
5
6
7
8
9
10
11
12
13
14
15
16
17
18
19
20
21
22
23
24
25
26
27
28
29
30
31
32
33
34
35
36
37
38
39
40
41
42
43
44
45
46
47
48
49
50
51
52
53
54
</pre></td><td class="rouge-code"><pre> 
<span class="nd">@SpringBootApplication</span><span class="o">(</span><span class="n">scanBasePackages</span><span class="o">={</span><span class="s">"io.ryos"</span><span class="o">})</span> <span class="err">➊</span>
<span class="nd">@EnableJpaRepositories</span><span class="o">(</span><span class="n">basePackages</span><span class="o">={</span><span class="s">"io.ryos"</span><span class="o">})</span> <span class="err">➋</span>
<span class="nd">@EnableTransactionManagement</span> <span class="err">➌</span>
<span class="nd">@PropertySource</span><span class="o">(</span><span class="s">"version.properties"</span><span class="o">)</span> <span class="err">➍</span>
<span class="kd">public</span> <span class="kd">class</span> <span class="nc">Application</span> <span class="o">{</span>
 
    <span class="kd">private</span> <span class="kd">static</span> <span class="kd">final</span> <span class="n">String</span> <span class="n">CONN_URL</span> <span class="o">=</span> 
        <span class="s">"jdbc:mysql://localhost:3306/ryos_auth?useUnicode=true&amp;characterEncoding=UTF-8"</span><span class="o">;</span>
        
    <span class="kd">private</span> <span class="kd">static</span> <span class="kd">final</span> <span class="n">String</span> <span class="n">SQL_DIALECT</span> <span class="o">=</span> 
        <span class="s">"org.hibernate.dialect.MySQL5InnoDBDialect"</span><span class="o">;</span>
 
    <span class="nd">@Qualifier</span><span class="o">(</span><span class="s">"dataSource"</span><span class="o">)</span> <span class="err">➎</span>
    <span class="nd">@Autowired</span>
    <span class="kd">private</span> <span class="n">DataSource</span> <span class="n">dataSource</span><span class="o">;</span>
    
    <span class="nd">@Bean</span>
    <span class="kd">public</span> <span class="n">DataSource</span> <span class="nf">dataSource</span><span class="o">()</span> <span class="o">{</span> <span class="err">➏</span>
        <span class="n">DriverManagerDataSource</span> <span class="n">dataSource</span> <span class="o">=</span> <span class="k">new</span> <span class="n">DriverManagerDataSource</span><span class="o">();</span>
        <span class="n">dataSource</span><span class="o">.</span><span class="na">setDriverClassName</span><span class="o">(</span><span class="s">"com.mysql.jdbc.Driver"</span><span class="o">);</span>
        <span class="n">dataSource</span><span class="o">.</span><span class="na">setUrl</span><span class="o">(</span><span class="n">CONN_URL</span><span class="o">);</span>
        <span class="n">dataSource</span><span class="o">.</span><span class="na">setUsername</span><span class="o">(</span><span class="s">"root"</span><span class="o">);</span>
        <span class="n">dataSource</span><span class="o">.</span><span class="na">setPassword</span><span class="o">(</span><span class="s">"p@ssw0rd"</span><span class="o">);</span>
        <span class="k">return</span> <span class="n">dataSource</span><span class="o">;</span>
    <span class="o">}</span>
    
    <span class="kd">private</span> <span class="n">Properties</span> <span class="nf">jpaProperties</span><span class="o">()</span> <span class="o">{</span> <span class="err">➐</span>
        <span class="n">Properties</span> <span class="n">properties</span> <span class="o">=</span> <span class="k">new</span> <span class="n">Properties</span><span class="o">();</span>
        <span class="n">properties</span><span class="o">.</span><span class="na">put</span><span class="o">(</span><span class="s">"hibernate.dialect"</span><span class="o">,</span> <span class="n">SQL_DIALECT</span><span class="o">);</span> 
        <span class="n">properties</span><span class="o">.</span><span class="na">put</span><span class="o">(</span><span class="s">"hibernate.show_sql"</span><span class="o">,</span> <span class="s">"true"</span><span class="o">);</span>
        <span class="k">return</span> <span class="n">properties</span><span class="o">;</span>  
    <span class="o">}</span>
    
    <span class="nd">@Bean</span>
    <span class="kd">public</span> <span class="n">LocalContainerEntityManagerFactoryBean</span> <span class="nf">entityManagerFactory</span><span class="o">()</span> <span class="o">{</span> <span class="err">➑</span>
        <span class="n">HibernateJpaVendorAdapter</span> <span class="n">vendorAdapter</span> <span class="o">=</span> <span class="k">new</span> <span class="n">HibernateJpaVendorAdapter</span><span class="o">();</span>
        <span class="n">vendorAdapter</span><span class="o">.</span><span class="na">setDatabase</span><span class="o">(</span><span class="n">Database</span><span class="o">.</span><span class="na">MYSQL</span><span class="o">);</span>
        <span class="n">vendorAdapter</span><span class="o">.</span><span class="na">setGenerateDdl</span><span class="o">(</span><span class="kc">true</span><span class="o">);</span>
        <span class="n">vendorAdapter</span><span class="o">.</span><span class="na">setShowSql</span><span class="o">(</span><span class="kc">true</span><span class="o">);</span>
        <span class="n">LocalContainerEntityManagerFactoryBean</span> <span class="n">factory</span> <span class="o">=</span> 
            <span class="k">new</span> <span class="nf">LocalContainerEntityManagerFactoryBean</span><span class="o">();</span>
        <span class="n">factory</span><span class="o">.</span><span class="na">setJpaVendorAdapter</span><span class="o">(</span><span class="n">vendorAdapter</span><span class="o">);</span>
        <span class="n">factory</span><span class="o">.</span><span class="na">setPackagesToScan</span><span class="o">(</span><span class="s">"io.ryos.dao.entity"</span><span class="o">);</span>
        <span class="n">factory</span><span class="o">.</span><span class="na">setDataSource</span><span class="o">(</span><span class="n">dataSource</span><span class="o">());</span>
        <span class="n">factory</span><span class="o">.</span><span class="na">setJpaProperties</span><span class="o">(</span><span class="n">jpaProperties</span><span class="o">());</span>
        <span class="k">return</span> <span class="n">factory</span><span class="o">;</span>
    <span class="o">}</span>
    
    <span class="kd">public</span> <span class="kd">static</span> <span class="kt">void</span> <span class="nf">main</span><span class="o">(</span><span class="n">String</span><span class="o">[]</span> <span class="n">args</span><span class="o">)</span> <span class="o">{</span> <span class="err">➒</span>
        <span class="n">SpringApplication</span><span class="o">.</span><span class="na">run</span><span class="o">(</span><span class="n">Application</span><span class="o">.</span><span class="na">class</span><span class="o">,</span> <span class="n">args</span><span class="o">);</span>
    <span class="o">}</span>
<span class="o">}</span>
 
</pre></td></tr></tbody></table></code></pre></div></div>

<p><strong>Example - 5 : Application class.</strong></p>

<p>With the “dataSource” bean configuration ➎ a data source is configured, that is how the application does reach the database ➏. Spring makes the data source class-wide available. ➐ jpaProperties is a helper method which provides required properties for JPA. ➑ “entityManagerFactory” method is a Java-based bean configuration, that is employed to instantiate EntityManagerFactory instance, that is the gateway to the persistence context where the entities and their life-cycles are managed. Finally, ➒ is the main method to start the Spring Boot application.</p>

<p>The first component we create is the Authorization Server. I will put all application components into a single Spring Boot project for the sake of ease. But, in a real-life application, you probably need to consider to separate the applications, the authorization and resource server. But, before we begin with Authorization and Resource Server, first, we will set up web security. Fortunately, Spring provides configurer adapter classes that need to be inherited while implementing <code class="language-plaintext highlighter-rouge"><table class="rouge-table"><tbody><tr><td class="rouge-gutter gl"><pre class="lineno">1
</pre></td><td class="rouge-code"><pre>configure()</pre></td></tr></tbody></table></code> methods.</p>

<div class="language-java highlighter-rouge"><div class="highlight"><pre class="highlight"><code><table class="rouge-table"><tbody><tr><td class="rouge-gutter gl"><pre class="lineno">1
2
3
4
5
6
7
8
9
10
11
12
13
14
15
16
17
18
19
20
21
22
23
24
25
26
27
28
29
</pre></td><td class="rouge-code"><pre> 
<span class="nd">@Configuration</span>
<span class="kd">public</span> <span class="kd">class</span> <span class="nc">WebSecurityConfiguration</span> <span class="kd">extends</span> <span class="n">WebSecurityConfigurerAdapter</span> <span class="o">{</span>
 
    <span class="nd">@Autowired</span>
    <span class="nd">@Qualifier</span><span class="o">(</span><span class="s">"userRepositoryService"</span><span class="o">)</span>
    <span class="kd">private</span> <span class="n">UserDetailsService</span> <span class="n">userDetailsService</span><span class="o">;</span> <span class="err">➊</span>
    
    <span class="nd">@Override</span>
    <span class="kd">protected</span> <span class="kt">void</span> <span class="nf">configure</span><span class="o">(</span><span class="n">AuthenticationManagerBuilder</span> <span class="n">auth</span><span class="o">)</span>
            <span class="kd">throws</span> <span class="n">Exception</span> <span class="o">{</span>
        <span class="n">auth</span><span class="o">.</span><span class="na">userDetailsService</span><span class="o">(</span><span class="n">userDetailsService</span><span class="o">);</span> <span class="err">➋</span>
    <span class="o">}</span>
    
    <span class="nd">@Override</span>
    <span class="nd">@Bean</span><span class="o">(</span><span class="n">name</span><span class="o">=</span><span class="s">"authenticationManagerBean"</span><span class="o">)</span>
    <span class="kd">public</span> <span class="n">AuthenticationManager</span> <span class="nf">authenticationManagerBean</span><span class="o">()</span>
            <span class="kd">throws</span> <span class="n">Exception</span> <span class="o">{</span>
        <span class="k">return</span> <span class="kd">super</span><span class="o">.</span><span class="na">authenticationManagerBean</span><span class="o">();</span> <span class="err">➌</span>
    <span class="o">}</span>
    
    <span class="nd">@Override</span>
    <span class="kd">protected</span> <span class="kt">void</span> <span class="nf">configure</span><span class="o">(</span><span class="n">HttpSecurity</span> <span class="n">http</span><span class="o">)</span> <span class="kd">throws</span> <span class="n">Exception</span> <span class="o">{</span>
        <span class="n">http</span><span class="o">.</span><span class="na">csrf</span><span class="o">().</span><span class="na">disable</span><span class="o">()</span> <span class="err">➍</span>
                <span class="o">.</span><span class="na">authorizeRequests</span><span class="o">().</span><span class="na">antMatchers</span><span class="o">(</span><span class="s">"/login"</span><span class="o">).</span><span class="na">permitAll</span><span class="o">().</span><span class="na">and</span><span class="o">()</span> <span class="err">➎</span>
                <span class="o">.</span><span class="na">authorizeRequests</span><span class="o">().</span><span class="na">anyRequest</span><span class="o">().</span><span class="na">hasRole</span><span class="o">(</span><span class="s">"USER"</span><span class="o">);</span> <span class="err">➏</span>
    <span class="o">}</span>
<span class="o">}</span>
 
</pre></td></tr></tbody></table></code></pre></div></div>

<p>➊ Please note that, we inject userDetailsService, the service component, that is used to access database to read user data. ➋ The userDetailsServer reference is passed to the Authentication Manager so that it is able to know how to access user database. ➌ We create an authentication manager bean. With ➍, we configure web security and its boundaries. By default, the security rules apply to all requests, but we can also define matchers to tell the framework on which resources what kind of rules are going to be effective in runtime e.g in ➎ and ➏ we permit all request targeting <strong>/login</strong> while requiring to have the role “USER”.</p>

<h3 id="authorization-server">Authorization Server</h3>

<p>As we saw earlier, authorization server is the component where tokens are issued to the clients. Implementing an Authorization Server with Spring, is simply to add another Bean configuration into the project. The bean configuration for the authorization server extends <strong>AuthorizationServer- ConfigurerAdapter</strong> and is annotated with <strong>@EnableAuthorizationServer</strong> which is necessary to enable the authorization server component. There are two other Spring components get injected via <strong>@Autowired</strong>, the <strong>authenticationManager</strong> and the <strong>userDetailsService</strong>. The latter is the repository and DAO indicating how Spring framework accesses the user data in database and the former is authenticationManager.</p>

<div class="language-java highlighter-rouge"><div class="highlight"><pre class="highlight"><code><table class="rouge-table"><tbody><tr><td class="rouge-gutter gl"><pre class="lineno">1
2
3
4
5
6
7
8
9
10
11
12
13
14
15
16
17
18
19
20
21
22
23
24
25
26
27
28
29
30
31
32
33
34
35
36
37
38
39
40
41
42
43
</pre></td><td class="rouge-code"><pre> 
<span class="nd">@Configuration</span>
<span class="nd">@EnableAuthorizationServer</span>
<span class="kd">public</span> <span class="kd">class</span> <span class="nc">AuthorizationServerConfiguration</span> <span class="kd">extends</span> <span class="n">AuthorizationServerConfigurerAdapter</span> <span class="o">{</span>
 
    <span class="nd">@Autowired</span>
    <span class="nd">@Qualifier</span><span class="o">(</span><span class="s">"authenticationManagerBean"</span><span class="o">)</span>
    <span class="kd">private</span> <span class="n">AuthenticationManager</span> <span class="n">authenticationManager</span><span class="o">;</span>
    
    <span class="nd">@Autowired</span>
    <span class="nd">@Qualifier</span><span class="o">(</span><span class="s">"userRepositoryService"</span><span class="o">)</span>
    <span class="kd">private</span> <span class="n">UserDetailsService</span> <span class="n">userDetailsService</span><span class="o">;</span>
    
    <span class="nd">@Override</span>
    <span class="kd">public</span> <span class="kt">void</span> <span class="nf">configure</span><span class="o">(</span><span class="n">AuthorizationServerSecurityConfigurer</span> <span class="n">oauthServer</span><span class="o">)</span> <span class="kd">throws</span> <span class="n">Exception</span> <span class="o">{</span>
        <span class="n">oauthServer</span><span class="o">.</span><span class="na">tokenKeyAccess</span><span class="o">(</span><span class="s">"permitAll()"</span><span class="o">).</span><span class="na">checkTokenAccess</span><span class="o">(</span><span class="s">"isAuthenticated()"</span><span class="o">);</span> <span class="err">➊</span>
    <span class="o">}</span>
    
    <span class="nd">@Override</span>
    <span class="kd">public</span> <span class="kt">void</span> <span class="nf">configure</span><span class="o">(</span><span class="n">ClientDetailsServiceConfigurer</span> <span class="n">clients</span><span class="o">)</span> <span class="kd">throws</span> <span class="n">Exception</span> <span class="o">{</span>
                
        <span class="n">clients</span><span class="o">.</span><span class="na">inMemory</span><span class="o">()</span> <span class="err">➋</span>
                <span class="o">.</span><span class="na">withClient</span><span class="o">(</span><span class="s">"ryosApp"</span><span class="o">)</span> <span class="err">➌</span>
                <span class="o">.</span><span class="na">secret</span><span class="o">(</span><span class="s">"abc123"</span><span class="o">)</span>
                <span class="o">.</span><span class="na">scopes</span><span class="o">(</span><span class="s">"world"</span><span class="o">)</span> <span class="err">➍</span>
                <span class="o">.</span><span class="na">authorizedGrantTypes</span><span class="o">(</span><span class="s">"password"</span><span class="o">,</span> <span class="s">"refresh_token"</span><span class="o">)</span> <span class="err">➎</span>
                <span class="o">.</span><span class="na">resourceIds</span><span class="o">(</span><span class="s">"resource"</span><span class="o">);</span>
    <span class="o">}</span>
    
    <span class="nd">@Override</span>
    <span class="kd">public</span> <span class="kt">void</span> <span class="nf">configure</span><span class="o">(</span><span class="n">AuthorizationServerEndpointsConfigurer</span> <span class="n">endpoints</span><span class="o">)</span>
            <span class="kd">throws</span> <span class="n">Exception</span> <span class="o">{</span>
        <span class="n">endpoints</span><span class="o">.</span><span class="na">tokenStore</span><span class="o">(</span><span class="n">tokenStore</span><span class="o">())</span> <span class="err">➏</span>
                <span class="o">.</span><span class="na">authenticationManager</span><span class="o">(</span><span class="n">authenticationManager</span><span class="o">)</span>
                <span class="o">.</span><span class="na">userDetailsService</span><span class="o">(</span><span class="n">userDetailsService</span><span class="o">);</span>
    <span class="o">}</span>
    
    <span class="nd">@Bean</span>
    <span class="kd">public</span> <span class="n">TokenStore</span> <span class="nf">tokenStore</span><span class="o">()</span> <span class="o">{</span>
        <span class="k">return</span> <span class="k">new</span> <span class="nf">InMemoryTokenStore</span><span class="o">();</span> <span class="err">➐</span>
    <span class="o">}</span>
<span class="o">}</span>
 
</pre></td></tr></tbody></table></code></pre></div></div>

<p>The bean configuration for the authorization server extends an adapter class, “AuthorizationServer- ConfigurerAdapter” and it is annotated with <strong>@EnableAuthorizationServer</strong> which enables the authorization server throughout the application. There are two other Spring components which get injected by <strong>@Autowired</strong>, the authenticationManager and the userDetailsService. The latter is the instance to the repository and DAO which helps us in accessing the user data and the former is authenticationManager.</p>

<p>Let us stick with the <strong>AuthenticationManager</strong> a bit, first, the interface with the <strong>authenticate()</strong> method. The implementation of AuthenticationManager, the <strong>ProviderManager</strong> is responsible to authenticate the request by iterating over authentication providers. It is technically hooked up to the security servlet filters and does process requests before they reach any REST resources. If AuthenticationManager is successful, it returns a non-null response that indicates that the request is authorized. If none of the providers returns a non-null response, then the request will end up with an AuthorizationException.</p>

<p>In “AuthorizationServerConfiguration”, we define three overloaded <strong>configure()</strong> methods, ➊ taking a AuthorizationServerSecurityConfigurer as parameter. It configures security rules for Authorization Server, for instance, permit all requests to the endpoint through which access tokens are issued while requiring authorized access on the token endpoint. In the second configure method, ➋ we set up the Client Details Service - just like user details service, it is responsible for providing information about the client. We use in our example an in-memory service with a single static client ➌ “ryos” and its secret, ➍ with read and write scopes and grant types ➎ “password” and “refresh_token”. With ➏, we hand the token store, authentication manager, and the user details service over to the authentication server endpoint configurer. ➐ As token store, we use also an in-memory store provided by the framework.</p>

<h3 id="resource-server">Resource Server</h3>

<p>It is now time to set up the resource server. In resource server configuration, we do not have that much. The configuration bean is annotated with <strong>@EnableResourceServer</strong> while extending ResourceServer- ConfigurerAdapter class, provided by the framework. The bean configuration overrides the configure method and defines the resource id.</p>

<div class="language-java highlighter-rouge"><div class="highlight"><pre class="highlight"><code><table class="rouge-table"><tbody><tr><td class="rouge-gutter gl"><pre class="lineno">1
2
3
4
5
6
7
8
9
10
11
12
13
14
15
16
</pre></td><td class="rouge-code"><pre> 
<span class="nd">@Configuration</span>
<span class="nd">@EnableResourceServer</span>
<span class="kd">public</span> <span class="kd">class</span> <span class="nc">ResourcesServerConfiguration</span> <span class="kd">extends</span> <span class="n">ResourceServerConfigurerAdapter</span> <span class="o">{</span>
 
    <span class="nd">@Override</span>
    <span class="kd">public</span> <span class="kt">void</span> <span class="nf">configure</span><span class="o">(</span><span class="n">ResourceServerSecurityConfigurer</span> <span class="n">resources</span><span class="o">)</span> <span class="o">{</span>
        <span class="n">resources</span><span class="o">.</span><span class="na">resourceId</span><span class="o">(</span><span class="s">"resource"</span><span class="o">);</span>
    <span class="o">}</span>
    
    <span class="nd">@Override</span>
    <span class="kd">public</span> <span class="kt">void</span> <span class="nf">configure</span><span class="o">(</span><span class="n">HttpSecurity</span> <span class="n">http</span><span class="o">)</span> <span class="kd">throws</span> <span class="n">Exception</span> <span class="o">{</span>
        <span class="n">http</span><span class="o">.</span><span class="na">authorizeRequests</span><span class="o">().</span><span class="na">antMatchers</span><span class="o">(</span><span class="s">"/version"</span><span class="o">).</span><span class="na">authenticated</span><span class="o">();</span>
    <span class="o">}</span>
<span class="o">}</span>
 
</pre></td></tr></tbody></table></code></pre></div></div>

<p>In the overloaded configure()- method which takes the HttpSecurity parameter, HttpSecurity instance is configured while requiring the requests having authorized on matching resource “/version” and having authenticated.</p>

<h3 id="the-rest-resource">The REST Resource</h3>

<p>The API’s REST resource which is handling the review requests looks like as follows:</p>

<div class="language-java highlighter-rouge"><div class="highlight"><pre class="highlight"><code><table class="rouge-table"><tbody><tr><td class="rouge-gutter gl"><pre class="lineno">1
2
3
4
5
6
7
8
9
10
11
12
13
14
15
16
17
</pre></td><td class="rouge-code"><pre> 
<span class="nd">@Controller</span>
<span class="nd">@RequestMapping</span><span class="o">(</span><span class="s">"/reviews"</span><span class="o">)</span> <span class="err">➊</span>
<span class="kd">public</span> <span class="kd">class</span> <span class="nc">HelloResource</span> <span class="o">{</span>
 
    <span class="nd">@Autowired</span>
    <span class="kd">private</span> <span class="n">BookReviewService</span> <span class="n">bookReviewService</span><span class="o">;</span> <span class="err">➋</span>
 
    <span class="nd">@RequestMapping</span><span class="o">(</span><span class="n">method</span> <span class="o">=</span> <span class="n">RequestMethod</span><span class="o">.</span><span class="na">GET</span><span class="o">)</span> 
    <span class="kd">public</span> <span class="nd">@ResponseBody</span>
    <span class="n">ResponseEntity</span> <span class="nf">showReview</span><span class="o">(</span>
        <span class="kd">final</span> <span class="nd">@QueryParam</span><span class="o">(</span><span class="s">"isbn"</span><span class="o">)</span> <span class="n">String</span> <span class="n">isbn</span>
        <span class="kd">final</span> <span class="n">Principal</span> <span class="n">principal</span><span class="o">)</span> <span class="o">{</span> <span class="err">➌</span>
        <span class="k">return</span> <span class="n">bookReviewService</span><span class="o">.</span><span class="na">getReview</span><span class="o">(</span><span class="n">isbn</span><span class="o">);</span>
    <span class="o">}</span>
<span class="o">}</span>
 
</pre></td></tr></tbody></table></code></pre></div></div>

<p>➊ The REST resource handler accepts GET requests targeting to <code class="language-plaintext highlighter-rouge"><table class="rouge-table"><tbody><tr><td class="rouge-gutter gl"><pre class="lineno">1
</pre></td><td class="rouge-code"><pre>/reviews</pre></td></tr></tbody></table></code> API endpoint. The response object that is returned from the BookReviewService ➋ of which instance is injected to the resource by Spring’s IoC container. ➌ The resource handler method showReview does, in addition, declare an argument, <code class="language-plaintext highlighter-rouge"><table class="rouge-table"><tbody><tr><td class="rouge-gutter gl"><pre class="lineno">1
</pre></td><td class="rouge-code"><pre>Principal</pre></td></tr></tbody></table></code> which contains the security context, about that we talk later and an HTTP query parameter “isbn” ISBN number of the book.</p>

<h2 id="testing">Testing</h2>

<p>We can test the authorization server by making requests, for instance, with cURL and ask for an access token as well as refresh token:</p>

<div class="language-bash highlighter-rouge"><div class="highlight"><pre class="highlight"><code><table class="rouge-table"><tbody><tr><td class="rouge-gutter gl"><pre class="lineno">1
2
3
4
</pre></td><td class="rouge-code"><pre>curl ryosApp:abc123@localhost:9000/oauth/token <span class="se">\</span>
   <span class="nt">-d</span> <span class="nv">username</span><span class="o">=</span>bagdemir  <span class="se">\</span>
   <span class="nt">-d</span> <span class="nv">password</span><span class="o">=</span>123456 <span class="se">\</span>
   <span class="nt">-d</span> <span class="nv">grant_type</span><span class="o">=</span>password
</pre></td></tr></tbody></table></code></pre></div></div>
<p>the response,</p>
<div class="language-json highlighter-rouge"><div class="highlight"><pre class="highlight"><code><table class="rouge-table"><tbody><tr><td class="rouge-gutter gl"><pre class="lineno">1
2
3
4
5
6
7
</pre></td><td class="rouge-code"><pre><span class="p">{</span><span class="w">
    </span><span class="s2">"access_token"</span><span class="p">:</span><span class="w"> </span><span class="s2">"93e8733e-022b-4387-abf5-79974323e7f5"</span><span class="p">,</span><span class="w">
    </span><span class="s2">"token_type"</span><span class="p">:</span><span class="w"> </span><span class="s2">"bearer"</span><span class="p">,</span><span class="w">
    </span><span class="s2">"refresh_token"</span><span class="p">:</span><span class="w"> </span><span class="s2">"0fbfc23c-5f1d-4c13-afbd-7c2144122ed2"</span><span class="p">,</span><span class="w">
    </span><span class="s2">"expires_in"</span><span class="p">:</span><span class="w"> </span><span class="mi">43199</span><span class="p">,</span><span class="w">
    </span><span class="s2">"scope"</span><span class="p">:</span><span class="w"> </span><span class="s2">"read write"</span><span class="w">
</span><span class="p">}</span><span class="w"> 
</span></pre></td></tr></tbody></table></code></pre></div></div>

<p>Once we acquired the access token, we now are able to access protected resources. But first, let me try to call the REST resource with the access token:</p>

<div class="language-bash highlighter-rouge"><div class="highlight"><pre class="highlight"><code><table class="rouge-table"><tbody><tr><td class="rouge-gutter gl"><pre class="lineno">1
</pre></td><td class="rouge-code"><pre>curl <span class="nt">-X</span> GET http://localhost:9000/version
</pre></td></tr></tbody></table></code></pre></div></div>
<p>and the result,</p>
<div class="language-json highlighter-rouge"><div class="highlight"><pre class="highlight"><code><table class="rouge-table"><tbody><tr><td class="rouge-gutter gl"><pre class="lineno">1
2
3
4
</pre></td><td class="rouge-code"><pre><span class="p">{</span><span class="w">
    </span><span class="s2">"error"</span><span class="p">:</span><span class="w"> </span><span class="s2">"unauthorized"</span><span class="p">,</span><span class="w">
    </span><span class="s2">"error_description"</span><span class="p">:</span><span class="w"> </span><span class="s2">"Full authentication is required to access this resource"</span><span class="w">
</span><span class="p">}</span><span class="w">
</span></pre></td></tr></tbody></table></code></pre></div></div>

<p>As you can see, we may not access the protected resource without providing an access token. In the next example request, we provide the access token in the Authorization header as bearer:</p>

<div class="language-bash highlighter-rouge"><div class="highlight"><pre class="highlight"><code><table class="rouge-table"><tbody><tr><td class="rouge-gutter gl"><pre class="lineno">1
2
</pre></td><td class="rouge-code"><pre> curl <span class="nt">-X</span> GET http://localhost:9000/version <span class="se">\</span>
    <span class="nt">-H</span> <span class="s2">"Authorization: Bearer 32f3f08e-e124-444b-bfc4-55bd559b44a7"</span>
</pre></td></tr></tbody></table></code></pre></div></div>
<p>and the result,</p>
<div class="language-json highlighter-rouge"><div class="highlight"><pre class="highlight"><code><table class="rouge-table"><tbody><tr><td class="rouge-gutter gl"><pre class="lineno">1
2
3
4
5
</pre></td><td class="rouge-code"><pre><span class="p">{</span><span class="w">
    </span><span class="s2">"versionInfo"</span><span class="p">:</span><span class="w"> </span><span class="mi">1</span><span class="p">,</span><span class="w">
    </span><span class="s2">"buildInfo"</span><span class="p">:</span><span class="w"> </span><span class="s2">"1"</span><span class="p">,</span><span class="w">
    </span><span class="s2">"releaseDateStr"</span><span class="p">:</span><span class="w"> </span><span class="s2">"12.04.2018"</span><span class="w">
</span><span class="p">}</span><span class="w">
</span></pre></td></tr></tbody></table></code></pre></div></div>]]></content><author><name>erhan</name></author><category term="Web Services" /><category term="featured" /><summary type="html"><![CDATA[Using OAuth 2.0 as so to manage authorization and to control user access on your REST resources is essential part of enterprise Java applications.]]></summary><media:thumbnail xmlns:media="http://search.yahoo.com/mrss/" url="http://localhost:4000/images/25.png" /><media:content medium="image" url="http://localhost:4000/images/25.png" xmlns:media="http://search.yahoo.com/mrss/" /></entry><entry><title type="html">Matrix URIs, their semantics and usage in Java RESTful Services</title><link href="http://localhost:4000/MatrixParams/" rel="alternate" type="text/html" title="Matrix URIs, their semantics and usage in Java RESTful Services" /><published>2020-11-01T00:00:00+01:00</published><updated>2020-11-01T00:00:00+01:00</updated><id>http://localhost:4000/MatrixParams</id><content type="html" xml:base="http://localhost:4000/MatrixParams/"><![CDATA[<p>Matrix URIs, as <em><a href="https://www.w3.org/People/Berners-Lee/">Tim Berners-Lee</a></em> called them in his personal <em><a href="https://www.w3.org/DesignIssues/MatrixURIs.html">design draft</a></em> back then in 1996, or matrix parameters and sometimes path parameters, have been broadly adopted by applications in web services landscape, today. Their syntax is specified in the <em><a href="https://tools.ietf.org/html/rfc3986#section-3.3">RFC3986</a></em> “Uniform Resource Identifier (URI): Generic Syntax” in section 3.3 while reserving the usage of “;” and “=“ for the applications which prefer to apply a list of delimited qualifiers to the path segments. The original idea behind the matrix parameters is to enhance the hierarchical structure of URIs, that allows applications to navigate a tree structure with ease, with another space as a matrix - that is where matrix term comes from:</p>

<blockquote>
  <p>Just as the slash separated set of elements is useful for representing a tree, so a set of names and equally significant parameter can represent a space more like a (possible sparse) matrix.</p>
</blockquote>

<p>Although the RFC3986 does touch upon matrix parameters as sub-components of path segments and the delimiters “;” and “=“ are defined as “reserved” characters, the RFC is reluctant to call them “matrix” parameters. The reason is, matrix URIs were still in proposal state as the RFC3986 was published and its status has not been changed since then. In this blog, we will take a closer look at a few examples of matrix URLs and how they are incorporated in higher-level concepts like Java API for RESTful Services. Let us begin with a simple example:</p>

<div class="language-shell highlighter-rouge"><div class="highlight"><pre class="highlight"><code><table class="rouge-table"><tbody><tr><td class="rouge-gutter gl"><pre class="lineno">1
2
</pre></td><td class="rouge-code"><pre>/foo<span class="p">;</span><span class="nv">version</span><span class="o">=</span>1/manifest
/foo<span class="p">;</span><span class="nv">version</span><span class="o">=</span>2/manifest
</pre></td></tr></tbody></table></code></pre></div></div>
<p><br />
According to the RFC, the semantics of matrix URIs - and how they qualify a particular path segment within a hierarchical path is left to the implementation. In the example above, the path down to the manifest file is branching depending on the version parameter. Identification of the resource, manifest, might vary with different values of version parameter, but it might also stay the same. It is up to the application.</p>

<p>Matrix URIs gain inevitably complexity with the number of parameters, they define,</p>

<p><img src="https://user-images.githubusercontent.com/1160613/97791717-ae3ab880-1bd5-11eb-886e-3529d38b091e.jpg" alt="matrix_parameter" /></p>

<p>this time, each path segment has its own list of qualifying matrix parameter, extending the dimension of the hierarchical system. The additional vector might be compelling for creators of new specifications and implementators thereof with the conceptual building-blocks of a higher-layer domain, that relies on matrix URIs. One good example for that higher-level domain is the JAX-RS specification, that is Java API for RESTful web services and <code class="highlight language-java" data-lang="java"><span class="nd">@MatrixParam</span></code> annotation, that makes matrix parameters first-class entities. In the following example, JAX RS’ <code class="highlight language-java" data-lang="java"><span class="nd">@MatrixParam</span></code> annotation is used to extract the value of a matrix parameter from URIs:</p>

<div class="language-java highlighter-rouge"><div class="highlight"><pre class="highlight"><code><table class="rouge-table"><tbody><tr><td class="rouge-gutter gl"><pre class="lineno">1
2
3
4
5
6
7
8
9
10
11
12
</pre></td><td class="rouge-code"><pre><span class="nd">@Service</span>
<span class="nd">@Path</span><span class="o">(</span><span class="s">"/"</span><span class="o">)</span>
<span class="kd">public</span> <span class="kd">class</span> <span class="nc">MatrixResource</span> <span class="o">{</span>

  <span class="nd">@GET</span>
  <span class="nd">@Path</span><span class="o">(</span><span class="s">"/status/ping"</span><span class="o">)</span>
  <span class="nd">@Produces</span><span class="o">(</span><span class="s">"text/plain"</span><span class="o">)</span>
  <span class="kd">public</span> <span class="n">String</span> <span class="nf">ping</span><span class="o">(</span><span class="nd">@MatrixParam</span><span class="o">(</span><span class="s">"name"</span><span class="o">)</span> <span class="n">String</span> <span class="n">name</span><span class="o">)</span> <span class="o">{</span>
    <span class="k">return</span> <span class="n">String</span><span class="o">.</span><span class="na">format</span><span class="o">(</span><span class="s">"matrix variable name=%s"</span><span class="o">,</span> <span class="n">name</span><span class="o">);</span>
  <span class="o">}</span>
<span class="o">}</span>

</pre></td></tr></tbody></table></code></pre></div></div>
<p><br />
The resource handler method <code class="highlight language-java" data-lang="java"><span class="n">ping</span><span class="o">()</span></code> accepts the requests targetting the /status/ping endpoint while declaring a matrix parameter “name” in the example above. If you you send an HTTP GET request to the /status/ping endpoint, the response will be:</p>

<div class="language-shell highlighter-rouge"><div class="highlight"><pre class="highlight"><code><table class="rouge-table"><tbody><tr><td class="rouge-gutter gl"><pre class="lineno">1
2
</pre></td><td class="rouge-code"><pre>➜ curl <span class="nt">-X</span> GET http://localhost:8080/status/ping
matrix parameter <span class="nv">name</span><span class="o">=</span>null
</pre></td></tr></tbody></table></code></pre></div></div>
<p><br />
if no matrix parameter is provided, the value is null, as expected. Another request with a matrix parameter ;name=bar,</p>

<div class="language-shell highlighter-rouge"><div class="highlight"><pre class="highlight"><code><table class="rouge-table"><tbody><tr><td class="rouge-gutter gl"><pre class="lineno">1
2
</pre></td><td class="rouge-code"><pre>➜ curl <span class="nt">-X</span> GET <span class="s1">'http://localhost:8080/status/ping;name=bar'</span>
matrix parameter <span class="nv">name</span><span class="o">=</span>bar
</pre></td></tr></tbody></table></code></pre></div></div>
<p><br />
the matrix param has the value “bar”. But, in the following example the value of the matrix parameter will be <em>null</em>, that might be confusing:</p>

<div class="language-shell highlighter-rouge"><div class="highlight"><pre class="highlight"><code><table class="rouge-table"><tbody><tr><td class="rouge-gutter gl"><pre class="lineno">1
2
</pre></td><td class="rouge-code"><pre>➜ curl <span class="nt">-X</span> GET <span class="s1">'http://localhost:8080/status;name=bar/ping'</span>
matrix parameter <span class="nv">name</span><span class="o">=</span>null
</pre></td></tr></tbody></table></code></pre></div></div>
<p><br />
The reason for this is, that the <code class="highlight language-java" data-lang="java"><span class="nd">@MatrixParam</span></code> annotation “refers to a name of a matrix parameter that resides in the last matched path segment of the Path-annotated Java structure that injects the value of the matrix parameter”, as JEE/EE4J JAX-RS API outlines. The request handler equipped with <code class="highlight language-java" data-lang="java"><span class="nd">@MatrixParam</span></code> is not capable to resolve the matrix parameter of intermediate path segments within the same request handler. This would make the JAX-RS specification look congruent with the RFC-3986. Nevertheless, the JAX-RS implementations remove this gap by opening up the access to matrix parameters via PathSegments:</p>

<div class="language-java highlighter-rouge"><div class="highlight"><pre class="highlight"><code><table class="rouge-table"><tbody><tr><td class="rouge-gutter gl"><pre class="lineno">1
2
3
4
5
6
7
8
9
10
11
12
13
</pre></td><td class="rouge-code"><pre><span class="nd">@Service</span>
<span class="nd">@Path</span><span class="o">(</span><span class="s">"/"</span><span class="o">)</span>
<span class="kd">public</span> <span class="kd">class</span> <span class="nc">MatrixResource</span> <span class="o">{</span>

  <span class="nd">@GET</span>
  <span class="nd">@Path</span><span class="o">(</span><span class="s">"/{status}/ping"</span><span class="o">)</span>
  <span class="nd">@Produces</span><span class="o">(</span><span class="s">"text/plain"</span><span class="o">)</span>
  <span class="kd">public</span> <span class="n">String</span> <span class="nf">ping</span><span class="o">(</span><span class="nd">@PathParam</span><span class="o">(</span><span class="s">"status"</span><span class="o">)</span> <span class="n">PathSegment</span> <span class="n">status</span><span class="o">)</span> <span class="o">{</span>
    <span class="n">MultivaluedMap</span><span class="o">&lt;</span><span class="n">String</span><span class="o">,</span> <span class="n">String</span><span class="o">&gt;</span> <span class="n">matrixParameters</span> <span class="o">=</span> <span class="n">status</span><span class="o">.</span><span class="na">getMatrixParameters</span><span class="o">();</span>
    <span class="n">String</span> <span class="n">nameMatrixFromStatus</span> <span class="o">=</span> <span class="n">matrixParameters</span><span class="o">.</span><span class="na">getFirst</span><span class="o">(</span><span class="s">"name"</span><span class="o">);</span>
    <span class="k">return</span> <span class="n">String</span><span class="o">.</span><span class="na">format</span><span class="o">(</span><span class="s">"matrix variable name=%s"</span><span class="o">,</span> <span class="n">nameMatrixFromStatus</span><span class="o">);</span>
  <span class="o">}</span>
<span class="o">}</span>
</pre></td></tr></tbody></table></code></pre></div></div>
<p><br />
this time, the value of the matrix parameter is gathered from the PathSegment instance, that is defined with the path template {status}. Spring developers might have noticed this gap, because Spring’s non-JAX-RS-conform annotations solve this problem via partial binding:</p>

<div class="language-java highlighter-rouge"><div class="highlight"><pre class="highlight"><code><table class="rouge-table"><tbody><tr><td class="rouge-gutter gl"><pre class="lineno">1
2
3
4
5
6
7
8
9
10
</pre></td><td class="rouge-code"><pre><span class="nd">@RestController</span>
<span class="kd">public</span> <span class="kd">class</span> <span class="nc">MatrixResource</span> <span class="o">{</span>

  <span class="nd">@RequestMapping</span><span class="o">(</span><span class="n">value</span><span class="o">=</span><span class="s">"/{status}/ping"</span><span class="o">,</span> <span class="n">method</span><span class="o">=</span><span class="n">RequestMethod</span><span class="o">.</span><span class="na">GET</span><span class="o">)</span>
  <span class="kd">public</span> <span class="n">String</span> <span class="nf">pong</span><span class="o">(</span>
      <span class="nd">@PathVariable</span><span class="o">(</span><span class="s">"status"</span><span class="o">)</span> <span class="n">String</span> <span class="n">status</span><span class="o">,</span>
      <span class="nd">@MatrixVariable</span><span class="o">(</span><span class="n">name</span><span class="o">=</span><span class="s">"name"</span><span class="o">,</span> <span class="n">pathVar</span><span class="o">=</span><span class="s">"status"</span><span class="o">,</span> <span class="n">required</span><span class="o">=</span><span class="kc">false</span><span class="o">)</span> <span class="n">String</span> <span class="n">name</span><span class="o">)</span> <span class="o">{</span>
    <span class="k">return</span> <span class="n">String</span><span class="o">.</span><span class="na">format</span><span class="o">(</span><span class="s">"matrix variable name=%s"</span><span class="o">,</span> <span class="n">name</span><span class="o">);</span>
  <span class="o">}</span>
<span class="o">}</span>
</pre></td></tr></tbody></table></code></pre></div></div>
<p><br />
In Spring Boot, the “scope” of the matrix variable can be defined with “pathVar” attribute, explicitly, in contrast to JAX-RS standard annotations [See Note 1]. Still, this is a very good example for limitations of Java annotations if they are used to describe slightly complex structures. The idea of injecting data into class fields, constructors and method parameters is common in Java stack and has its charm, but as data structures are getting more dimensions like matrix URIs, specifications using annotations will be clumsy.</p>

<p>One might ask, “why do not we simply use query parameters instead of matrix parameters?”. Query parameters apply to the entire path. The URL with matrix parameters can be rewritten as follows:</p>

<div class="language-shell highlighter-rouge"><div class="highlight"><pre class="highlight"><code><table class="rouge-table"><tbody><tr><td class="rouge-gutter gl"><pre class="lineno">1
2
</pre></td><td class="rouge-code"><pre>/mylib<span class="p">;</span><span class="nv">version</span><span class="o">=</span>3/manifest<span class="p">;</span><span class="nv">version</span><span class="o">=</span>2/?format<span class="o">=</span>json
/mylib/manifest/?format<span class="o">=</span>json&amp;mylib_version<span class="o">=</span>3&amp;manifest_version<span class="o">=</span>2
</pre></td></tr></tbody></table></code></pre></div></div>
<p><br />
The URI with query parameters has less clarity and the query parameters need additional information for namespacing so as to resolve the ambiguity.</p>

<h3 id="conclusion">Conclusion</h3>

<p>Although the matrix URIs were just a design idea from Tim-Bernes Lee, they are widely adopted in web services landscape - especially web services in RESTful fashion. The frameworks implementing the JAX-RS does support matrix parameters, albeit their API specification might not look congruent with the original idea, but implementations thereof e.g Jersey enable full access to matrix parameters in arbitrary path segments. Spring Boot variant does equip non-JAX-RS <code class="language-plaintext highlighter-rouge"><table class="rouge-table"><tbody><tr><td class="rouge-gutter gl"><pre class="lineno">1
</pre></td><td class="rouge-code"><pre>@MatrixVariable</pre></td></tr></tbody></table></code> annotation with additional attributes which allows to define the context of matrix variable.</p>

<h3 id="references">References</h3>

<ol>
  <li>https://www.w3.org/DesignIssues/MatrixURIs.html, Tim Berners-Lee</li>
  <li>https://stackoverflow.com/questions/2048121/url-matrix-parameters-vs-query-parameters</li>
  <li>https://jakarta.ee/specifications/restful-ws/3.0/restful-ws-spec-3.0-M1.pdf</li>
  <li>https://tools.ietf.org/html/rfc3986#section-3.3</li>
  <li>https://forum.raml.org/t/rfc3986-matrix-variables/73</li>
  <li>https://jakarta.ee/specifications/restful-ws/3.0/restful-ws-spec-3.0-M1.pdf [PDF]</li>
</ol>

<h3 id="notes">Notes:</h3>

<ol>
  <li>The matrix variables are needed to be activated in Spring Boot application:</li>
</ol>

<div class="language-java highlighter-rouge"><div class="highlight"><pre class="highlight"><code><table class="rouge-table"><tbody><tr><td class="rouge-gutter gl"><pre class="lineno">1
2
3
4
5
6
7
8
9
</pre></td><td class="rouge-code"><pre><span class="nd">@Configuration</span>
<span class="kd">public</span> <span class="kd">class</span> <span class="nc">MatrixConfig</span> <span class="kd">implements</span> <span class="n">WebMvcConfigurer</span> <span class="o">{</span>
  <span class="nd">@Override</span>
  <span class="kd">public</span> <span class="kt">void</span> <span class="nf">configurePathMatch</span><span class="o">(</span><span class="n">PathMatchConfigurer</span> <span class="n">configurer</span><span class="o">)</span> <span class="o">{</span>
    <span class="n">UrlPathHelper</span> <span class="n">urlPathHelper</span> <span class="o">=</span> <span class="k">new</span> <span class="n">UrlPathHelper</span><span class="o">();</span>
    <span class="n">urlPathHelper</span><span class="o">.</span><span class="na">setRemoveSemicolonContent</span><span class="o">(</span><span class="kc">false</span><span class="o">);</span>
    <span class="n">configurer</span><span class="o">.</span><span class="na">setUrlPathHelper</span><span class="o">(</span><span class="n">urlPathHelper</span><span class="o">);</span>
  <span class="o">}</span>
<span class="o">}</span>
</pre></td></tr></tbody></table></code></pre></div></div>

<p><br /></p>
<div style="font-size:9px; font-color:#EFEFEF; ">Rev 1.0 1.Nov 2020</div>]]></content><author><name>erhan</name></author><category term="Web Services" /><category term="featured" /><summary type="html"><![CDATA[Matrix URIs, as Tim Berners-Lee called them in his personal design draft back then in 1996, or matrix parameters and sometimes path parameters, have been broadly adopted by applications in web services landscape, today. Their syntax is specified in the RFC3986 “Uniform Resource Identifier (URI): Generic Syntax” in section 3.3 while reserving the usage of “;” and “=“ for the applications which prefer to apply a list of delimited qualifiers to the path segments. The original idea behind the matrix parameters is to enhance the hierarchical structure of URIs, that allows applications to navigate a tree structure with ease, with another space as a matrix - that is where matrix term comes from:]]></summary><media:thumbnail xmlns:media="http://search.yahoo.com/mrss/" url="http://localhost:4000/images/19.jpg" /><media:content medium="image" url="http://localhost:4000/images/19.jpg" xmlns:media="http://search.yahoo.com/mrss/" /></entry><entry><title type="html">Rhino: Load DSL</title><link href="http://localhost:4000/LoadDSL/" rel="alternate" type="text/html" title="Rhino: Load DSL" /><published>2019-09-27T00:00:00+02:00</published><updated>2019-09-27T00:00:00+02:00</updated><id>http://localhost:4000/LoadDSL</id><content type="html" xml:base="http://localhost:4000/LoadDSL/"><![CDATA[<p><a href="https://github.com/ryos-io/Rhino">Rhino Load and Performance Testing</a> framework is celebrating its 1.8.0 release, with the new version, the Rhino Load DSL (beta) reached another milestone towards its production readiness as it enables developers to write load and performance tests with its new DSL operations. Load DSL, in addition to Scenarios, allows developers to write their tests in a declarative style. DSL is a powerful tool to tell Rhino how synthetic load has to be generated, instead of providing the actual load generation implementation; hence, the load testing code doesn’t need to manage the concurrency and/or client configurations if your tests, for instance, are targeting web services. The framework will then materialize the DSL into reactive components and the concurrency will be managed by the reactive machinery under the hood.</p>

<p>Since the Scenario mode in Rhino simulations is the default one, if you want to enable the DSL mode, you need to change the Runner implementation by adding the <a href="http://ryos.io/static/javadocs/io/ryos/rhino/sdk/annotations/Runner.html">@Runner</a> annotation to your Simulation class and passing the <a href="http://ryos.io/static/javadocs/io/ryos/rhino/sdk/runners/ReactiveHttpSimulationRunner.html">ReactiveHttpSimulationRunner</a> to its clazz attribute:</p>

<div class="language-java highlighter-rouge"><div class="highlight"><pre class="highlight"><code><table class="rouge-table"><tbody><tr><td class="rouge-gutter gl"><pre class="lineno">1
2
3
4
5
6
7
8
9
10
11
12
13
14
15
16
17
18
19
20
21
</pre></td><td class="rouge-code"><pre><span class="nd">@Simulation</span><span class="o">(</span><span class="n">name</span> <span class="o">=</span> <span class="s">"File Upload Simulation"</span><span class="o">)</span> <span class="err">❶</span>
<span class="nd">@Runner</span><span class="o">(</span><span class="n">clazz</span> <span class="o">=</span> <span class="n">ReactiveHttpSimulationRunner</span><span class="o">.</span><span class="na">class</span><span class="o">)</span> <span class="err">❷</span>
<span class="nd">@UserRepository</span><span class="o">(</span><span class="n">factory</span> <span class="o">=</span> <span class="n">OAuthUserRepositoryFactoryImpl</span><span class="o">.</span><span class="na">class</span><span class="o">)</span>
<span class="kd">public</span> <span class="kd">class</span> <span class="nc">UploadDSL</span> <span class="o">{</span>

  <span class="nd">@Provider</span><span class="o">(</span><span class="n">factory</span> <span class="o">=</span> <span class="n">UUIDProvider</span><span class="o">.</span><span class="na">class</span><span class="o">)</span>
  <span class="kd">private</span> <span class="n">UUIDProvider</span> <span class="n">uuidProvider</span><span class="o">;</span>

  <span class="nd">@Dsl</span><span class="o">(</span><span class="n">name</span> <span class="o">=</span> <span class="s">"Upload File"</span><span class="o">)</span> <span class="err">❸</span>
  <span class="kd">public</span> <span class="n">LoadDsl</span> <span class="nf">singleTestDsl</span><span class="o">()</span> <span class="o">{</span>
    <span class="k">return</span> <span class="n">Start</span><span class="o">.</span><span class="na">dsl</span><span class="o">()</span> <span class="err">❹</span>
        <span class="o">.</span><span class="na">run</span><span class="o">(</span><span class="n">http</span><span class="o">(</span><span class="s">"PUT text.txt"</span><span class="o">)</span> <span class="err">❺</span>
            <span class="o">.</span><span class="na">header</span><span class="o">(</span><span class="n">c</span> <span class="o">-&gt;</span> <span class="n">from</span><span class="o">(</span><span class="n">X_REQUEST_ID</span><span class="o">,</span> <span class="s">"Rhino-"</span> <span class="o">+</span> <span class="n">uuidProvider</span><span class="o">.</span><span class="na">take</span><span class="o">()))</span>
            <span class="o">.</span><span class="na">header</span><span class="o">(</span><span class="n">X_API_KEY</span><span class="o">,</span> <span class="n">SimulationConfig</span><span class="o">.</span><span class="na">getApiKey</span><span class="o">())</span>
            <span class="o">.</span><span class="na">auth</span><span class="o">()</span>
            <span class="o">.</span><span class="na">endpoint</span><span class="o">((</span><span class="n">c</span><span class="o">)</span> <span class="o">-&gt;</span> <span class="s">"http://foo/"</span> <span class="o">+</span> <span class="n">uuidProvider</span><span class="o">.</span><span class="na">take</span><span class="o">())</span>
            <span class="o">.</span><span class="na">upload</span><span class="o">(()</span> <span class="o">-&gt;</span> <span class="n">file</span><span class="o">(</span><span class="s">"classpath:///test.txt"</span><span class="o">))</span>
            <span class="o">.</span><span class="na">put</span><span class="o">()</span>
            <span class="o">.</span><span class="na">saveTo</span><span class="o">(</span><span class="s">"result"</span><span class="o">));</span> <span class="err">❻</span>
  <span class="o">}</span>
<span class="o">}</span>
</pre></td></tr></tbody></table></code></pre></div></div>

<p>Simulation entity starts with the <a href="http://ryos.io/static/javadocs/io/ryos/rhino/sdk/annotations/Simulation.html">@Simulation</a> ❶ annotation which marks the class as a load testing 
entity. To enable the DSL mode, we use <a href="http://ryos.io/static/javadocs/io/ryos/rhino/sdk/annotations/Runner.html">@Runner</a> ❷ with the simulation runner implementation, <a href="http://ryos.io/static/javadocs/io/ryos/rhino/sdk/runners/ReactiveHttpSimulationRunner.html">ReactiveHttpSimulationRunner</a> (Default runner is the <a href="http://ryos.io/static/javadocs/io/ryos/rhino/sdk/runners/DefaultSimulationRunner.html">DefaultSimulationRunner</a> which runs the Scenario methods). DSL methods are marked with <a href="http://ryos.io/static/javadocs/io/ryos/rhino/sdk/annotations/Dsl.html">@Dsl</a> ❸ with a name which is used in reporting of performance measurements, that is mandatory. The implementation of the DSL method uses chained-style method invocations, starts with <code class="language-plaintext highlighter-rouge"><table class="rouge-table"><tbody><tr><td class="rouge-gutter gl"><pre class="lineno">1
</pre></td><td class="rouge-code"><pre>Start.dsl()</pre></td></tr></tbody></table></code> ❹ and followed by runner methods, like run, runIf, runUntil, etc. ❺ Runner methods takes Specs instances as parameters. A Spec describes how a load test action to be performed. The result of execution will be stored in the 
session with ❻ for the next runners and specs.</p>

<p>You can now run the “File Upload Simulation” with a simple Java application:</p>

<div class="language-java highlighter-rouge"><div class="highlight"><pre class="highlight"><code><table class="rouge-table"><tbody><tr><td class="rouge-gutter gl"><pre class="lineno">1
2
3
</pre></td><td class="rouge-code"><pre>  <span class="kd">public</span> <span class="kd">static</span> <span class="kt">void</span> <span class="nf">main</span><span class="o">(</span><span class="n">String</span> <span class="o">...</span> <span class="n">args</span><span class="o">)</span> <span class="o">{</span>
      <span class="n">Simulation</span><span class="o">.</span><span class="na">create</span><span class="o">(</span><span class="n">PROPS</span><span class="o">,</span> <span class="n">RhinoDSL</span><span class="o">.</span><span class="na">class</span><span class="o">).</span><span class="na">start</span><span class="o">();</span>
  <span class="o">}</span>
</pre></td></tr></tbody></table></code></pre></div></div>

<p>The framework will then generate the load according to the DSL.</p>

<h2 id="load-dsl-is-extensible">Load DSL is extensible</h2>

<p>Rhino DSL framework is extensible. In addition to the specs which framework provides for you, by the way, you can easily add new spec types and materializers thereof to extend the DSL framework. A spec materializer is a component which 
takes spec instances as input and creates reactive components.</p>

<p>Simulations might have one or more Dsl methods and each DSL method comprises a set of runner methods. Runner methods takes the Spec instances as parameters and materializes them by using spec materializers.</p>

<p>Let’s have a look at an example spec, <strong>SomeSpec</strong> which is the spec for executing arbitrary code:</p>

<div class="language-java highlighter-rouge"><div class="highlight"><pre class="highlight"><code><table class="rouge-table"><tbody><tr><td class="rouge-gutter gl"><pre class="lineno">1
2
3
4
5
6
</pre></td><td class="rouge-code"><pre><span class="kd">public</span> <span class="kd">interface</span> <span class="nc">SomeSpec</span> <span class="kd">extends</span> <span class="n">Spec</span> <span class="o">{</span>

  <span class="n">Spec</span> <span class="nf">as</span><span class="o">(</span><span class="n">Function</span><span class="o">&lt;</span><span class="n">UserSession</span><span class="o">,</span> <span class="n">String</span><span class="o">&gt;</span> <span class="n">function</span><span class="o">);</span>

  <span class="n">Function</span><span class="o">&lt;</span><span class="n">UserSession</span><span class="o">,</span> <span class="n">String</span><span class="o">&gt;</span> <span class="nf">getFunction</span><span class="o">();</span>
<span class="o">}</span>
</pre></td></tr></tbody></table></code></pre></div></div>

<p><code class="language-plaintext highlighter-rouge"><table class="rouge-table"><tbody><tr><td class="rouge-gutter gl"><pre class="lineno">1
</pre></td><td class="rouge-code"><pre>as()</pre></td></tr></tbody></table></code> method takes an argument of <a href="https://docs.oracle.com/javase/8/docs/api/java/util/function/Function.html">Function&lt;UserSession, String&gt;</a> which is run by the enclosing runner. The <a href="http://ryos.io/static/javadocs/io/ryos/rhino/sdk/dsl/specs/Spec.html">Spec</a> implementation is just a simple builder:</p>

<div class="language-java highlighter-rouge"><div class="highlight"><pre class="highlight"><code><table class="rouge-table"><tbody><tr><td class="rouge-gutter gl"><pre class="lineno">1
2
3
4
5
6
7
8
9
10
11
12
13
14
15
16
17
18
19
</pre></td><td class="rouge-code"><pre><span class="kd">public</span> <span class="kd">class</span> <span class="nc">SomeSpecImpl</span> <span class="kd">extends</span> <span class="n">AbstractSpec</span> <span class="kd">implements</span> <span class="n">SomeSpec</span> <span class="o">{</span>

  <span class="kd">private</span> <span class="n">Function</span><span class="o">&lt;</span><span class="n">UserSession</span><span class="o">,</span> <span class="n">String</span><span class="o">&gt;</span> <span class="n">function</span><span class="o">;</span>

  <span class="kd">public</span> <span class="nf">SomeSpecImpl</span><span class="o">(</span><span class="kd">final</span> <span class="n">String</span> <span class="n">measurement</span><span class="o">)</span> <span class="o">{</span>
    <span class="kd">super</span><span class="o">(</span><span class="n">Objects</span><span class="o">.</span><span class="na">requireNonNull</span><span class="o">(</span><span class="n">measurement</span><span class="o">));</span>
  <span class="o">}</span>

  <span class="nd">@Override</span>
  <span class="kd">public</span> <span class="n">Spec</span> <span class="nf">as</span><span class="o">(</span><span class="kd">final</span> <span class="n">Function</span><span class="o">&lt;</span><span class="n">UserSession</span><span class="o">,</span> <span class="n">String</span><span class="o">&gt;</span> <span class="n">function</span><span class="o">)</span> <span class="o">{</span>
    <span class="k">this</span><span class="o">.</span><span class="na">function</span> <span class="o">=</span> <span class="n">Objects</span><span class="o">.</span><span class="na">requireNonNull</span><span class="o">(</span><span class="n">function</span><span class="o">);</span>
    <span class="k">return</span> <span class="k">this</span><span class="o">;</span>
  <span class="o">}</span>

  <span class="nd">@Override</span>
  <span class="kd">public</span> <span class="n">Function</span><span class="o">&lt;</span><span class="n">UserSession</span><span class="o">,</span> <span class="n">String</span><span class="o">&gt;</span> <span class="nf">getFunction</span><span class="o">()</span> <span class="o">{</span>
    <span class="k">return</span> <span class="n">function</span><span class="o">;</span>
  <span class="o">}</span>
<span class="o">}</span>
</pre></td></tr></tbody></table></code></pre></div></div>

<p>as <a href="http://ryos.io/static/javadocs/io/ryos/rhino/sdk/dsl/specs/Spec.html">Spec</a> instances are holding the information which is needed in materialization process, materializers take the information conveyed by specs and transform them into reactive components. A simple materializer which takes the <a href="http://ryos.io/static/javadocs/io/ryos/rhino/sdk/dsl/specs/Spec.html">Spec</a> instance and produces a <a href="https://projectreactor.io/docs/core/release/api/reactor/core/publisher/Mono.html">Mono</a>:</p>

<div class="language-java highlighter-rouge"><div class="highlight"><pre class="highlight"><code><table class="rouge-table"><tbody><tr><td class="rouge-gutter gl"><pre class="lineno">1
2
3
4
5
6
7
8
9
10
11
12
</pre></td><td class="rouge-code"><pre><span class="kd">public</span> <span class="kd">class</span> <span class="nc">SomeSpecMaterializer</span> <span class="kd">implements</span> <span class="n">SpecMaterializer</span><span class="o">&lt;</span><span class="n">SomeSpec</span><span class="o">,</span> <span class="n">UserSession</span><span class="o">&gt;</span> <span class="o">{</span>

  <span class="nd">@Override</span>
  <span class="kd">public</span> <span class="n">Mono</span><span class="o">&lt;</span><span class="n">UserSession</span><span class="o">&gt;</span> <span class="nf">materialize</span><span class="o">(</span><span class="n">SomeSpec</span> <span class="n">spec</span><span class="o">,</span> <span class="n">UserSession</span> <span class="n">userSession</span><span class="o">)</span> <span class="o">{</span>

    <span class="k">return</span> <span class="n">Mono</span><span class="o">.</span><span class="na">just</span><span class="o">(</span><span class="n">userSession</span><span class="o">)</span>
        <span class="o">.</span><span class="na">flatMap</span><span class="o">(</span><span class="n">session</span> <span class="o">-&gt;</span> <span class="n">Mono</span><span class="o">.</span><span class="na">fromCallable</span><span class="o">(()</span> <span class="o">-&gt;</span> <span class="o">{</span>
          <span class="kt">var</span> <span class="n">status</span> <span class="o">=</span> <span class="n">spec</span><span class="o">.</span><span class="na">getFunction</span><span class="o">().</span><span class="na">apply</span><span class="o">(</span><span class="n">session</span><span class="o">);</span>
          <span class="k">return</span> <span class="n">session</span><span class="o">;</span>
        <span class="o">}));</span>
  <span class="o">}</span>
<span class="o">}</span>
</pre></td></tr></tbody></table></code></pre></div></div>
<p>I hid some details about performance measurement in the implementation to keep the example simple. If you want to throw a look into the full implementation of SomeSpecMaterializer, please follow the <a href="https://github.com/ryos-io/Rhino/blob/master/rhino-core/src/main/java/io/ryos/rhino/sdk/dsl/mat/SomeSpecMaterializer.java">link</a>.</p>

<p>Now, you can use your new spec in the DSL:</p>

<div class="language-java highlighter-rouge"><div class="highlight"><pre class="highlight"><code><table class="rouge-table"><tbody><tr><td class="rouge-gutter gl"><pre class="lineno">1
2
3
4
5
6
7
8
9
10
11
</pre></td><td class="rouge-code"><pre>  <span class="nd">@Dsl</span><span class="o">(</span><span class="n">name</span> <span class="o">=</span> <span class="s">"Some"</span><span class="o">)</span>
  <span class="kd">public</span> <span class="n">LoadDsl</span> <span class="nf">singleTestDsl</span><span class="o">()</span> <span class="o">{</span>
    <span class="k">return</span> <span class="n">Start</span><span class="o">.</span><span class="na">dsl</span><span class="o">()</span>
        <span class="o">.</span><span class="na">run</span><span class="o">(</span><span class="n">some</span><span class="o">(</span><span class="s">"test"</span><span class="o">)</span> <span class="err">❶</span>
        <span class="o">.</span><span class="na">as</span><span class="o">(</span><span class="n">session</span> <span class="o">-&gt;</span> <span class="o">{</span>  <span class="err">❷</span>
            <span class="n">session</span><span class="o">.</span><span class="na">add</span><span class="o">(</span><span class="s">"say"</span><span class="o">,</span> <span class="s">"hello world"</span><span class="o">);</span>
            <span class="k">return</span> <span class="s">"OK"</span><span class="o">;</span>
        <span class="o">}))</span>
        <span class="o">.</span><span class="na">saveTo</span><span class="o">(</span><span class="s">"result"</span><span class="o">);</span>
  <span class="o">}</span>
<span class="o">}</span>
</pre></td></tr></tbody></table></code></pre></div></div>

<p><code class="language-plaintext highlighter-rouge"><table class="rouge-table"><tbody><tr><td class="rouge-gutter gl"><pre class="lineno">1
</pre></td><td class="rouge-code"><pre>some()</pre></td></tr></tbody></table></code> method ❶ is just a static factory which creates a new SomeSpecImpl intance for convenience. SomeSpec function takes a session object ❷ as parameter. Sessions are contextual objects to store data. For more information about sessions, please follow the <a href="http://ryos.io/mydoc_sessions.html">link</a>. That’s it. You have just created your first functional Spec component.</p>

<h2 id="wrap-up">Wrap-up</h2>

<p>Load DSL is the domain specific language to implement load and performance tests in Rhino. DSL declares how synthetic load is to be generated whereas the scenario methods contain actual implementation of the load generation process. Load DSL is extensible. You can add your own specs and materializers to create new operations. Furthermore, using Load DSL comes at a price. If your tests are getting more complex, your DSL methods will get longer and  readability may suffer from long chained method calls. So, you might prefer to use the Scenario mode, instead.</p>]]></content><author><name>erhan</name></author><category term="Testing" /><category term="Load Testing" /><category term="Performance Testing" /><summary type="html"><![CDATA[Create load and performance tests in a domain-specific language in Java.]]></summary><media:thumbnail xmlns:media="http://search.yahoo.com/mrss/" url="http://localhost:4000/images/02.jpg" /><media:content medium="image" url="http://localhost:4000/images/02.jpg" xmlns:media="http://search.yahoo.com/mrss/" /></entry><entry><title type="html">Rhino: Load Testing Framework</title><link href="http://localhost:4000/Rhino-Getting-Started/" rel="alternate" type="text/html" title="Rhino: Load Testing Framework" /><published>2019-09-08T00:00:00+02:00</published><updated>2019-09-08T00:00:00+02:00</updated><id>http://localhost:4000/Rhino-Getting-Started</id><content type="html" xml:base="http://localhost:4000/Rhino-Getting-Started/"><![CDATA[<p>Rhino Load and Performance Testing Framework is a sub-project of the Rhino umbrella project and an SDK which 
enables developers to write load and performance tests in JUnit style. With annotation 
based development model, load test developers can provide the framework with metadata required for running tests. The Rhino is developed under Apache 2.0.</p>

<h2 id="creating-your-first-project">Creating your first project</h2>

<p>You can create Rhino projects by using Rhino Archetype. The Maven Archetype project allows 
developers to create new Rhino performance testing projects from the scratch:</p>

<div class="language-bash highlighter-rouge"><div class="highlight"><pre class="highlight"><code><table class="rouge-table"><tbody><tr><td class="rouge-gutter gl"><pre class="lineno">1
2
3
4
5
6
</pre></td><td class="rouge-code"><pre><span class="nv">$ </span>mvn archetype:generate <span class="se">\</span>
  <span class="nt">-DarchetypeGroupId</span><span class="o">=</span>io.ryos.rhino <span class="se">\</span>
  <span class="nt">-DarchetypeArtifactId</span><span class="o">=</span>rhino-archetype <span class="se">\</span>
  <span class="nt">-DarchetypeVersion</span><span class="o">=</span>2.2.1 <span class="se">\</span>
  <span class="nt">-DgroupId</span><span class="o">=</span>com.acme <span class="se">\</span>
  <span class="nt">-DartifactId</span><span class="o">=</span>my-foo-load-tests
</pre></td></tr></tbody></table></code></pre></div></div>
<p><br />
For the groupId, you need to set your project’s groupId, that is specific to your project and organization e.g <code class="language-plaintext highlighter-rouge"><table class="rouge-table"><tbody><tr><td class="rouge-gutter gl"><pre class="lineno">1
</pre></td><td class="rouge-code"><pre>com.yourcompany.testing</pre></td></tr></tbody></table></code> and the 
artifactId is some artifact id used to identify your project e.g <code class="language-plaintext highlighter-rouge"><table class="rouge-table"><tbody><tr><td class="rouge-gutter gl"><pre class="lineno">1
</pre></td><td class="rouge-code"><pre>my-test-project</pre></td></tr></tbody></table></code>. 
After entering the mvn command above, the project will be created which can be imported in your IDE.</p>

<p>You may choose to create a Rhino project without using the Rhino archetype. In this case, you can add the Rhino core dependency into your POM file:</p>

<div class="language-xml highlighter-rouge"><div class="highlight"><pre class="highlight"><code><table class="rouge-table"><tbody><tr><td class="rouge-gutter gl"><pre class="lineno">1
2
3
4
5
</pre></td><td class="rouge-code"><pre><span class="nt">&lt;dependency&gt;</span>
  <span class="nt">&lt;groupId&gt;</span>io.ryos.rhino<span class="nt">&lt;/groupId&gt;</span>
  <span class="nt">&lt;artifactId&gt;</span>rhino-core<span class="nt">&lt;/artifactId&gt;</span>
  <span class="nt">&lt;version&gt;</span>1.8.2<span class="nt">&lt;/version&gt;</span>
<span class="nt">&lt;/dependency&gt;</span>
</pre></td></tr></tbody></table></code></pre></div></div>
<p><br />
<a href="https://github.com/ryos-io/Rhino/tree/master/rhino-hello-world">rhino-hello-world</a> located in the project’s root, might be a good starting point if you want to play around.</p>

<h2 id="writing-your-first-simulation-with-scenarios">Writing your first Simulation with Scenarios</h2>

<p>Rhino projects do consist of a main-method to run simulations and simulation 
entities which are annotated with Rhino annotations. An example application might look as follows:</p>

<div class="language-java highlighter-rouge"><div class="highlight"><pre class="highlight"><code><table class="rouge-table"><tbody><tr><td class="rouge-gutter gl"><pre class="lineno">1
2
3
4
5
6
7
8
9
10
11
</pre></td><td class="rouge-code"><pre><span class="kn">import</span> <span class="nn">io.ryos.rhino.sdk.Simulation</span><span class="o">;</span>

<span class="kd">public</span> <span class="kd">class</span> <span class="nc">Rhino</span> <span class="o">{</span>

    <span class="kd">private</span> <span class="kd">static</span> <span class="kd">final</span> <span class="n">String</span> <span class="n">PROPS</span> <span class="o">=</span> <span class="s">"classpath:///rhino.properties"</span><span class="o">;</span>
    <span class="kd">private</span> <span class="kd">static</span> <span class="kd">final</span> <span class="n">String</span> <span class="n">SIM_NAME</span> <span class="o">=</span> <span class="s">"Server-Status Simulation"</span><span class="o">;</span>

    <span class="kd">public</span> <span class="kd">static</span> <span class="kt">void</span> <span class="nf">main</span><span class="o">(</span><span class="n">String</span> <span class="o">...</span> <span class="n">args</span><span class="o">)</span> <span class="o">{</span>
        <span class="n">Simulation</span><span class="o">.</span><span class="na">create</span><span class="o">(</span><span class="n">PROPS</span><span class="o">,</span> <span class="n">SIM_NAME</span><span class="o">).</span><span class="na">start</span><span class="o">();</span>
    <span class="o">}</span>
<span class="o">}</span>
</pre></td></tr></tbody></table></code></pre></div></div>
<p><br />
<code class="language-plaintext highlighter-rouge"><table class="rouge-table"><tbody><tr><td class="rouge-gutter gl"><pre class="lineno">1
</pre></td><td class="rouge-code"><pre>Simulation</pre></td></tr></tbody></table></code> is the load testing controller instance which requires a configuration file in the classpath ( therefore <code class="language-plaintext highlighter-rouge"><table class="rouge-table"><tbody><tr><td class="rouge-gutter gl"><pre class="lineno">1
</pre></td><td class="rouge-code"><pre>classpath://&lt;absolute path to configuration file&gt;</pre></td></tr></tbody></table></code> prefix is important) and the name of the simulation to be run. You can also put the properties file outside of the classpath e.g somewhere on your disk: “file:///home/user/rhino.properties”</p>

<p>The name of the simulation must match the name, set in Simulation annotation so that the Simulation controller can locate the Simulation entity:</p>

<div class="language-java highlighter-rouge"><div class="highlight"><pre class="highlight"><code><table class="rouge-table"><tbody><tr><td class="rouge-gutter gl"><pre class="lineno">1
2
3
4
5
6
7
8
9
10
11
12
13
14
15
16
17
18
19
20
21
22
</pre></td><td class="rouge-code"><pre><span class="nd">@Simulation</span><span class="o">(</span><span class="n">name</span> <span class="o">=</span> <span class="s">"Server-Status Simulation"</span><span class="o">)</span>
<span class="kd">public</span> <span class="kd">class</span> <span class="nc">RhinoEntity</span> <span class="o">{</span>

  <span class="kd">private</span> <span class="kd">static</span> <span class="kd">final</span> <span class="n">String</span> <span class="n">TARGET</span> <span class="o">=</span> <span class="s">"http://localhost:8089/api/status"</span><span class="o">;</span>
  <span class="kd">private</span> <span class="kd">static</span> <span class="kd">final</span> <span class="n">String</span> <span class="n">X_REQUEST_ID</span> <span class="o">=</span> <span class="s">"X-Request-Id"</span><span class="o">;</span>
  
  <span class="kd">private</span> <span class="n">Client</span> <span class="n">client</span> <span class="o">=</span> <span class="n">ClientBuilder</span><span class="o">.</span><span class="na">newClient</span><span class="o">();</span>

  <span class="nd">@Provider</span><span class="o">(</span><span class="n">factory</span> <span class="o">=</span> <span class="n">UUIDProvider</span><span class="o">.</span><span class="na">class</span><span class="o">)</span>
  <span class="kd">private</span> <span class="n">UUIDProvider</span> <span class="n">uuidProvider</span><span class="o">;</span>

  <span class="nd">@Scenario</span><span class="o">(</span><span class="n">name</span> <span class="o">=</span> <span class="s">"Health"</span><span class="o">)</span>
  <span class="kd">public</span> <span class="kt">void</span> <span class="nf">performHealth</span><span class="o">(</span><span class="n">Measurement</span> <span class="n">measurement</span><span class="o">)</span> <span class="o">{</span>
    <span class="kt">var</span> <span class="n">response</span> <span class="o">=</span> <span class="n">client</span>
            <span class="o">.</span><span class="na">target</span><span class="o">(</span><span class="n">TARGET</span><span class="o">)</span>
            <span class="o">.</span><span class="na">request</span><span class="o">()</span>
            <span class="o">.</span><span class="na">header</span><span class="o">(</span><span class="n">X_REQUEST_ID</span><span class="o">,</span> <span class="s">"Rhino-"</span> <span class="o">+</span> <span class="n">uuidProvider</span><span class="o">.</span><span class="na">take</span><span class="o">())</span>
            <span class="o">.</span><span class="na">get</span><span class="o">();</span>

    <span class="n">measurement</span><span class="o">.</span><span class="na">measure</span><span class="o">(</span><span class="s">"Health API Call"</span><span class="o">,</span> <span class="n">String</span><span class="o">.</span><span class="na">valueOf</span><span class="o">(</span><span class="n">response</span><span class="o">.</span><span class="na">getStatus</span><span class="o">()));</span>
  <span class="o">}</span>
<span class="o">}</span>
</pre></td></tr></tbody></table></code></pre></div></div>
<p><br />
In the example above, we mark the simulation entity with <code class="language-plaintext highlighter-rouge"><table class="rouge-table"><tbody><tr><td class="rouge-gutter gl"><pre class="lineno">1
</pre></td><td class="rouge-code"><pre>@Simulation</pre></td></tr></tbody></table></code> annotation with a unique name attribute. The simulation entity is a container for the scenario methods which are run by the Rhino runtime and annotated with @Scenario annotation. Each scenario method must have a name which is used in performance measurements and reporting, so the scenario method takes the name “Health” for healthcheck test. The scenario methods will take `Measurement instance to let load testing developers add measurement points. In the example, we measure the time elapsed between the method execution and http request completion. A scenario method might contain multiple measurement points.</p>

<p>Once you start the Rhino main method, the framework will start to call the performHealth- method repeatedly and after each call, it will measure the time elapsed.</p>

<p>Alternatively, you may choose the reactive style and implements a <a href="https://github.com/ryos-io/Rhino/wiki/Reactive-Tests-and-Load-DSL">Load DSL</a>:</p>

<div class="language-java highlighter-rouge"><div class="highlight"><pre class="highlight"><code><table class="rouge-table"><tbody><tr><td class="rouge-gutter gl"><pre class="lineno">1
2
3
4
5
6
7
8
9
10
11
12
13
14
15
</pre></td><td class="rouge-code"><pre><span class="nd">@Simulation</span><span class="o">(</span><span class="n">name</span> <span class="o">=</span> <span class="s">"Reactive Sleep Test"</span><span class="o">)</span>
<span class="nd">@Runner</span><span class="o">(</span><span class="n">clazz</span> <span class="o">=</span> <span class="n">ReactiveHttpSimulationRunner</span><span class="o">.</span><span class="na">class</span><span class="o">)</span>
<span class="kd">public</span> <span class="kd">class</span> <span class="nc">ReactiveSleepTestSimulation</span> <span class="o">{</span>

  <span class="nd">@Dsl</span><span class="o">(</span><span class="n">name</span> <span class="o">=</span> <span class="s">"Health"</span><span class="o">)</span>
  <span class="kd">public</span> <span class="n">LoadDsl</span> <span class="nf">performHealth</span><span class="o">()</span> <span class="o">{</span>
    <span class="k">return</span> <span class="n">Start</span>
        <span class="o">.</span><span class="na">dsl</span><span class="o">()</span>
        <span class="o">.</span><span class="na">run</span><span class="o">(</span><span class="n">http</span><span class="o">(</span><span class="s">"Health API Call"</span><span class="o">)</span>
            <span class="o">.</span><span class="na">header</span><span class="o">(</span><span class="n">c</span> <span class="o">-&gt;</span> <span class="n">from</span><span class="o">(</span><span class="n">X_REQUEST_ID</span><span class="o">,</span> <span class="s">"Rhino-"</span> <span class="o">+</span> <span class="n">UUID</span><span class="o">.</span><span class="na">randomUUID</span><span class="o">().</span><span class="na">toString</span><span class="o">()))</span>
            <span class="o">.</span><span class="na">endpoint</span><span class="o">(</span><span class="n">TARGET</span><span class="o">)</span>
            <span class="o">.</span><span class="na">get</span><span class="o">()</span>
            <span class="o">.</span><span class="na">saveTo</span><span class="o">(</span><span class="s">"result"</span><span class="o">));</span>
  <span class="o">}</span>
<span class="o">}</span>
</pre></td></tr></tbody></table></code></pre></div></div>
<p><br />
To enable the DSL mode, you need to add <code class="language-plaintext highlighter-rouge"><table class="rouge-table"><tbody><tr><td class="rouge-gutter gl"><pre class="lineno">1
</pre></td><td class="rouge-code"><pre>ReactiveHttpSimulationRunner</pre></td></tr></tbody></table></code> to your Simulation. In this mode, the load testing developers describe how a load test is to be run instead of providing the implementation what to run.</p>

<p>The project is in its early development stage. Please feel free to join the community, use Rhino in your load test projects and create issues on <a href="https://github.com/ryos-io/Rhino/">Github</a>. We appreciate your contributions on the project.</p>]]></content><author><name>erhan</name></author><category term="Testing" /><category term="Load Testing" /><category term="Performance Testing" /><category term="Java" /><category term="Rhino" /><summary type="html"><![CDATA[Create JUnit-style load and performance tests in Java.]]></summary><media:thumbnail xmlns:media="http://search.yahoo.com/mrss/" url="http://localhost:4000/images/23.png" /><media:content medium="image" url="http://localhost:4000/images/23.png" xmlns:media="http://search.yahoo.com/mrss/" /></entry><entry><title type="html">Liskov Substitution Principle</title><link href="http://localhost:4000/Liskovs/" rel="alternate" type="text/html" title="Liskov Substitution Principle" /><published>2019-08-29T00:00:00+02:00</published><updated>2019-08-29T00:00:00+02:00</updated><id>http://localhost:4000/Liskovs</id><content type="html" xml:base="http://localhost:4000/Liskovs/"><![CDATA[<p>Liskov Substitution Principle (LSP) is a slick one. Violating this principle leads up to bugs which are hard to spot since the overriding subclasses change the internal state of the instance of the parent in such way so parent’s representation and the semantics of it is broken. Let’s have a look at the following Cat class from our hypothetical Farm game:</p>

<div class="language-java highlighter-rouge"><div class="highlight"><pre class="highlight"><code><table class="rouge-table"><tbody><tr><td class="rouge-gutter gl"><pre class="lineno">1
2
3
4
5
6
7
8
9
10
11
</pre></td><td class="rouge-code"><pre><span class="kd">public</span> <span class="kd">class</span> <span class="nc">Cat</span> <span class="o">{</span>
    <span class="kd">private</span> <span class="n">AnimalSound</span> <span class="n">sound</span><span class="o">;</span>
   
    <span class="kd">public</span> <span class="nf">Cat</span><span class="o">(</span><span class="n">AnimalSound</span> <span class="n">animalSound</span><span class="o">)</span> <span class="o">{</span>
        <span class="k">this</span><span class="o">.</span><span class="na">sound</span> <span class="o">=</span> <span class="n">animalSound</span><span class="o">;</span>
    <span class="o">}</span>

    <span class="kd">public</span> <span class="kt">void</span> <span class="nf">sing</span><span class="o">()</span> <span class="o">{</span>
        <span class="n">soundEffect</span><span class="o">(</span><span class="n">sound</span><span class="o">);</span>
    <span class="o">}</span>
<span class="o">}</span>
</pre></td></tr></tbody></table></code></pre></div></div>

<p>In our game we have cats singing. How they sing is determined by AnimalSound which is the internal state of Cat we maintain, and defines its behaviour, respectively. Everthing looks so far good. We can now instantiate new Cat objects and let them sing as follows:</p>

<div class="language-java highlighter-rouge"><div class="highlight"><pre class="highlight"><code><table class="rouge-table"><tbody><tr><td class="rouge-gutter gl"><pre class="lineno">1
2
3
4
5
6
7
</pre></td><td class="rouge-code"><pre><span class="n">Cat</span> <span class="n">cat1</span> <span class="o">=</span> <span class="k">new</span> <span class="n">Cat</span><span class="o">(</span><span class="n">AnimalSoundLib</span><span class="o">.</span><span class="na">MEOW</span><span class="o">);</span>
<span class="n">cat1</span><span class="o">.</span><span class="na">sing</span><span class="o">();</span> <span class="c1">// meooww</span>

<span class="n">Cat</span> <span class="n">cat2</span> <span class="o">=</span> <span class="k">new</span> <span class="n">Cat</span><span class="o">(</span><span class="n">AnimalSoundLib</span><span class="o">.</span><span class="na">MEOOO</span><span class="o">);</span>
<span class="n">cat2</span><span class="o">.</span><span class="na">sing</span><span class="o">();</span> <span class="c1">// meoooo</span>

<span class="c1">// more cats</span>
</pre></td></tr></tbody></table></code></pre></div></div>

<p>Now, our game grows and we need new animals in our game’s universe. Let’s imagine that the farm is located right next to the woods and there are bigger cats like lions, leopards, etc. Since lions are also cats - “is a” relationship, we can easily create a subclass of Cat type for Lion, right?</p>

<div class="language-java highlighter-rouge"><div class="highlight"><pre class="highlight"><code><table class="rouge-table"><tbody><tr><td class="rouge-gutter gl"><pre class="lineno">1
2
3
4
5
6
7
8
9
</pre></td><td class="rouge-code"><pre><span class="kd">public</span> <span class="kd">class</span> <span class="nc">Lion</span> <span class="kd">extends</span> <span class="n">Cat</span> <span class="o">{</span>

    <span class="kd">public</span> <span class="nf">Lion</span><span class="o">(</span><span class="n">AnimalSound</span> <span class="n">animalSound</span><span class="o">)</span> <span class="o">{</span>
        <span class="kd">super</span><span class="o">(</span><span class="n">animalSound</span><span class="o">);</span>
    <span class="o">}</span>

    <span class="kd">public</span> <span class="kt">void</span> <span class="nf">hunt</span><span class="o">()</span> <span class="o">{}</span>
    <span class="c1">// and other lion related methods.</span>
<span class="o">}</span>
</pre></td></tr></tbody></table></code></pre></div></div>

<p>Now, let’s create a new lion instance which roars:</p>

<div class="language-java highlighter-rouge"><div class="highlight"><pre class="highlight"><code><table class="rouge-table"><tbody><tr><td class="rouge-gutter gl"><pre class="lineno">1
2
</pre></td><td class="rouge-code"><pre><span class="n">Lion</span> <span class="n">lion</span> <span class="o">=</span> <span class="k">new</span> <span class="n">Lion</span><span class="o">(</span><span class="n">AnimalSoundLib</span><span class="o">.</span><span class="na">ROAR</span><span class="o">);</span>
<span class="n">lion</span><span class="o">.</span><span class="na">sing</span><span class="o">();</span> <span class="c1">// roarrr</span>
</pre></td></tr></tbody></table></code></pre></div></div>

<p>But, the problem comes to light once you attempt to use the Lion instance in place of a Cat instance while relying on runtime polymorphism. Let’s have a Bar of Cats in which we only expect cute little meowing cats singing happily after work:</p>

<div class="language-java highlighter-rouge"><div class="highlight"><pre class="highlight"><code><table class="rouge-table"><tbody><tr><td class="rouge-gutter gl"><pre class="lineno">1
2
3
4
5
6
7
8
9
10
11
12
13
14
</pre></td><td class="rouge-code"><pre><span class="kd">public</span> <span class="kd">class</span> <span class="nc">CatBar</span> <span class="o">{</span>
    <span class="kd">private</span> <span class="n">List</span><span class="o">&lt;</span><span class="n">Cat</span><span class="o">&gt;</span> <span class="n">catFriends</span> <span class="o">=</span> <span class="k">new</span> <span class="n">ArrayList</span><span class="o">&lt;&gt;();</span>

    <span class="kd">public</span> <span class="kt">void</span> <span class="nf">enter</span><span class="o">(</span><span class="n">Cat</span> <span class="n">cat</span><span class="o">)</span> <span class="o">{</span>
        <span class="n">catFriends</span><span class="o">.</span><span class="na">add</span><span class="o">(</span><span class="n">cat</span><span class="o">);</span>
    <span class="o">}</span>

    <span class="kd">public</span> <span class="kt">void</span> <span class="nf">singTogether</span><span class="o">()</span> <span class="o">{</span>

        <span class="k">for</span> <span class="o">(</span><span class="n">Cat</span> <span class="nl">cat:</span> <span class="n">catFriends</span><span class="o">)</span> <span class="o">{</span>
            <span class="n">cat</span><span class="o">.</span><span class="na">sing</span><span class="o">();</span>
        <span class="o">}</span>
    <span class="o">}</span>
<span class="o">}</span>
</pre></td></tr></tbody></table></code></pre></div></div>

<p>At some level in our application, we rely on a cat service which gives us cat objects back and of which implementation is contributed from an external Cat services team. Since the cat service library is introduced as a dependency in our project, we just want to use the service to have some cats without knowing internal implementation details of it. It is also legitimate to have Lion instances out of catService, since lions are also cats!</p>

<div class="language-java highlighter-rouge"><div class="highlight"><pre class="highlight"><code><table class="rouge-table"><tbody><tr><td class="rouge-gutter gl"><pre class="lineno">1
2
3
4
5
6
7
</pre></td><td class="rouge-code"><pre><span class="n">Cat</span> <span class="n">cat</span> <span class="o">=</span> <span class="n">catService</span><span class="o">.</span><span class="na">getCat</span><span class="o">();</span> <span class="c1">// a real cat created which meows</span>
<span class="n">catbar</span><span class="o">.</span><span class="na">enter</span><span class="o">(</span><span class="n">cat</span><span class="o">);</span> 

<span class="n">Cat</span> <span class="n">lion</span> <span class="o">=</span> <span class="n">catService</span><span class="o">.</span><span class="na">getCat</span><span class="o">();</span> <span class="c1">// this time the service gives you a lion instance back.</span>
<span class="n">catbar</span><span class="o">.</span><span class="na">enter</span><span class="o">(</span><span class="n">lion</span><span class="o">);</span>

<span class="n">catbar</span><span class="o">.</span><span class="na">singTogether</span><span class="o">();</span> <span class="c1">// party begins: meoww moewww ROOARRR meow</span>
</pre></td></tr></tbody></table></code></pre></div></div>

<p>But, what happens if the service returns a Lion object, which is technically a Cat and a valid return type, and we pass it to our CatBar where only meowing cats are expected to enter? Now, we should expect to have a trouble since we changed the semantics of the Cat instance by overriding its internal representation from a subclass as we set the cat’s sound to a ROAR. Now, we will not be able to use the Cat instance above since it roars!</p>

<blockquote>
  <p><strong>LSP tells us, we should be able to use the subclasses of class A, for instance, class B which extends class A in place of A, everywhere in our program without breaking the program’s behaviour.</strong></p>
</blockquote>

<p>The behavior of Cat instance has changed. On the other hand, runtime polymorphism allows to use subclasses of Cats, like Lion in our example, as Cats where we need which makes such an assignment valid. So, we violated the LSP which tells us,  we should be able to use the subclasses of class A, for instance, class B which extends class A in place of A, everywhere in our program without breaking the program’s behaviour. In our CatBar, therefore, we don’t only hear meows but also roars out of our CatBar.</p>]]></content><author><name>erhan</name></author><category term="Programming Techniques" /><category term="Design" /><category term="OOP" /><summary type="html"><![CDATA[Liskov Substitution Principle (LSP) is a slick one. Violating this principle leads up to bugs which are hard to spot since the overriding subclasses change the internal state of the instance of the parent in such way so parent’s representation and the semantics of it is broken. Let’s have a look at the following Cat class from our hypothetical Farm game:]]></summary><media:thumbnail xmlns:media="http://search.yahoo.com/mrss/" url="http://localhost:4000/images/04.jpg" /><media:content medium="image" url="http://localhost:4000/images/04.jpg" xmlns:media="http://search.yahoo.com/mrss/" /></entry></feed>